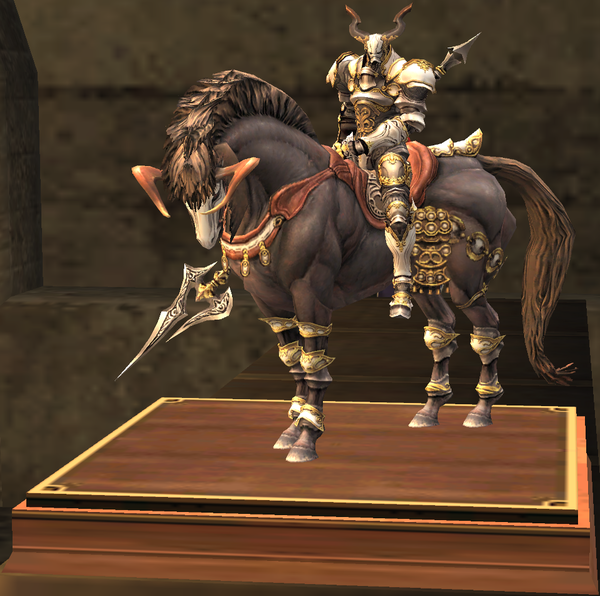
 In the last update, SE added both Alexander and Odin as new summons. This is pretty common knowledge I suspect, but what is lesser known is that like all of the rest of the quests to obtain summons, there are other rewards besides the summoning pacts. The quests to prep these fights are longer than the tuning fork quests for all of the rest of the summons, but they are not that difficult to complete. Today, I am going to focus on the Odin quest and the gear rewards from the fight that might be enticing for everyone, not just Summoners.
To start the quest to fight Odin you will first need to go to the Walahra Temple in Whitegate. If you have completed the Aht Urhgan storyline, then a cutscene will immediately be triggered and you will be able to begin the quest The Rider Cometh. While you are in Aht Urhgan you might as well take a moment to pick up a Sutlac and a Irmik Helvasi at the tea house NPC, trust me on this one, it will probably save you some money and time as you will need them later.
Next, you are going to head to Nashmau, head all the way North and talk to Yoyoroon. You will get another cutscene and you will be sent out to kill Ephramadian Shades (Fomor type mobs) to get a Timeworn Talisman. Interestingly and I believe quite rightly, Yoyoroon will not talk to you if you on Blue Mage. I believe this is not because of the general Qiqirn distaste for Blue Mages, but because Yoyoroon has a well developed understanding of FFXI end-game and also recognizes the complete uselessness of Blue Mage. LOL *cough* Where was I? Ah yes, I was able to solo the higher level ones in Caedarva Mire relatively easily on SAM/DNC, but I can't vouch for other jobs. Just be careful to pull them someplace safe because everything in that area aggro low HP, and there are true-sight Imps in the area too. Kill two or three of the Shades and even without TH you should get your Talisman in due time.
Head back to Nashmau and trade the Timeworm Talisman, the Sutlac and the Irmik Helvasi to Yoyoroon. The Sutlac is necessary to get Yoyoroon to accept the Timeworn Talisman and the Irmik Helvasi increases the chance that Yoyoroon will accept the Timeworn Talisman. There is always a chance that Yoyoroon will find that your Talisman will be what Yoyoroon is looking for, and you will have to get another Talisman, Sutlac and Irmik Helvasi. Once, Yoyoroon does take your Talisman, you will need to zone, and then come back and talk to the little Qiqirn one more time and he will give you the Talisman of the Rebel Gods which is a key item. Head back to Walahra Temple, and you will get the Talisman Key (another key item) and you will basically be ready to do the Odin fight after a cutscene at the door in Hazhalm Testing Grounds.
I haven't done the fight yet, but as soon as I do I will report back on it. It doesn't appear to be too difficult though and I have haven't heard any bad reports about the fight so far. Once you take down Odin you can take the gil (definitely not worth it), take the summoning pact (not so great if you don't care about your SMN), or you can pick between some pretty decent gear. Tomorrow I will go over the drops, which one is the best, which is the worst, and how many times you are going to need to do this fight to get everything you want.
Wednesday, May 05, 2010
Cheap Loots: The Rider Cometh
Monday, July 20, 2009
Morning in Vana'diel: Millions of Voices of Summoners Suddenly Cried Out In Terror and Were Suddenly Silenced.
Morning in Vana'diel is your daily dose of FFXI and all things Vana'diel. Give us your thoughts on the interesting topics of the day! Today, Ring can't figure what SE is doing and how they are going to survive the Summoner Holocaust that is currently descending on their offices.
Update day! And no word on a new Avatar. The new Avatars were announced over a year and a half ago, and restated 6 months ago, and essentially promised for the last update then this update. And still absolutely nothing. This really is getting pathetic. There are only three major items in this entire update: the NIN JA's, opening Northlands in the past, and the Union system. And it remains to be seen just how good this Union system is going to be.
I am now convinced that these mini-expansions are killing our updates. They are working on getting everything done for them and cutting out all of the meat of the updates. And Summoners are probably getting screwed the most out of this all. For most jobs you just get a JA here or a new spell there, but nothing is so definitive about the change for Summoner as a new Avatar. They are iconic and the main stay of the job. Promising them and then not delivering for a year and a half is just irresponsible to the player base.
I normally don't care about SMN outside of Summoner-burns, but they have their place in the game and they should get what is promised after such a long time. I don't know, vaporware seems to be an American tradition, but then again SE does love teasing stuff then taking forever to put it out. Not just in FFXI but all of their games. But knowing that doesn't make things any better for the Summoners that have been left out in the cold with no Alexander or Ixion or Cait-Sith or whatever.
Do you feel for the Summoners? Do you care about them outside of Summoner-burns? Do you want to see more Avatars? Or do you think that Summoners are just spoiled kids begging for new toys? Leave a comment and tell us what you think!
Thursday, June 25, 2009
The Math of Sword and Spell: Party Multipliers part two
Every Thursday Araelus is bringing the science to FFXI.
The Math of Sword and Spell will be a column dedicated not only to the hardcore calculations and statistics of FFXI, but more importantly he will help you use that math without confusing you. You may not know why you are playing better, but rest assured you will be playing better. This week's edition focuses on how White Mage and Scholar can enhance your party's effectiveness, and mentions the abandoned Dancer and Summoner jobs.
This week's article contained a few mistakes that have thankfully been fixed due to reader support and commentary. Thank you to Evilpaul for pointing out that Double Weather is +25%, which I should have remembered from Enspell math, hmm hmm, and I like pie too, by the way. Thank you to Yoteo for pointing out an error regarding Erase. I suppose I meant that Erase cannot be cast outside the party. -Araelus, 25 June 11:33pm
Last week, we discussed some of the ways Red Mages and Bards can benefit a party, but those are only the most stressed-out of the backline. What about some of the other support roles FFXI has to offer? This week we consider the dedicated White Mage healer, the bookworm Scholar, even two forgotten jobs: Dancer and Summoner.
White Mages have had their ups and downs, but are currently the best healers in Vana’diel. Powerhouse instant HP restoration abilities don’t stop them from casting certain enfeebles, top-tier protective magic, and even reducing the enemy’s TP gain.
Cure – the amount of HP restored first depends on MND, then Healing Magic skill, then VIT. But since multipliers do more than expected, it becomes clear Cure Potency +% is the best available stat. It increases the amount of HP cured after all other statistics are taken into account. Divine Seal doubles a Cure, or +100%, and equipment can boost this factor all the time.
Under normal circumstances, for the average White Mage, this would mean a Templar Mace and Noble’s Tunic for a +20% bonus. The use of a mace instead of a staff allows for the Muse Tariqah (MND+7, interrupt down 10%) or Legion Scutum (Enmity -2) as desired.
Going beyond the standard equipment, a Roundel Earring (Potency +5%) is from the Plucking Wings Yagudo Op, and the BCNM50 reward Medicine Ring (Potency +10%) works when HP is at or below 75% and TP is below 100. In Temenos, a Korin Obi means Potency +25%. In Salvage, the Lambda Sash provides Potency +3%, but this is a rare reward from Assault.
The solo ENM “Pulling the Strings” might produce a Healing Feather, which gives twenty charges of Potency +15%, each for three minutes. Wealthy White Mages can get another Potency +2% from the HQ Aristocrat’s Coat, and if they are subbing NIN for Dual Wield should sub an Asklepios for Potency +5%.
This means the maximum Cure Potency +% values for everyday use with the best possible gear is +57%. In Salvage, 60%, and in Temenos, +82%. Just remember that the more HP restored, the more Enmity gained. Don’t forget to have Afflatus Solace active, which further increases each Cure’s HP return through a 25-second duration Stoneskin buffer effect.
Haste – no less powerful than when cast by a Red Mage, although no better, either. If both mages are present in one party, courtesy dictates they settle on a Haste pattern. For example, if the tank is getting Refresh and Phalanx II, usually the White Mage will pick up that Haste.
Bar-spells – in addition to having access to every Bar-ra spell, White Mages can cast more powerful elemental bar-spells than any other job. While Red Mages have an 11.3% higher base Enhancing skill cap, and cap out 18.3% higher sans merits, White Mages can directly boost their Bar-spells’ effect and add in a Magic Defense Bonus.
The number next to the elemental icon in the equipment screen after a Bar-spell is cast is equal to Enhancing Magic skill times 0.2, plus 40, rounded down. A capped RDM gets 100, a capped WHM gets 91. But then the WHM should be wearing Cleric's Pantaloons (Bar+20, HQ is Bar+22) and that immediately surpasses RDM’s best. Add in a Blessed Briault and Afflatus Solace and Red Mage can no longer compete. This doesn’t even take into account a possible bonus from White Mage Bar-spell Effect merits.
Regen – White Mages have the option of Regen’s 8.33 HP/MP (125HP in 75 seconds), Regen II’s 6.67 HP/MP (240HP in 60 seconds), or Regen III’s 6.25 HP/MP (400HP in 60 seconds) and that is without any effort on their part. Bothering to equip a Cleric’s Briault when casting adds one, two, or three more HP per three seconds to each spell respectively, and maxed Regen Merits adds 5HP/tick to each spell.
At most, Regen gives 18.3 HP/MP (275HP in 75 seconds), Regen II gives 10.56 HP/MP (380HP in 60 seconds), and Regen III gives 8.75 HP/MP (560HP in 60 seconds). It should be easy to see why Regen Merits are the second most popular merits for White Mages, after Cure Cast Time.
Auspice – a recent addition to the arsenal, this spell grants Subtle Blow to all party members for 48 MP and lasts three minutes.
Devotion – this ranged Convert JA transforms 25% of a White Mage’s HP to another party member’s MP. It cannot be used solo. Meriting Devotion takes away from possible Protectra and Shellra V tiers, but around 22% of White Mages have at least unlocked the ability, making it twice as popular as Martyr, the HP to 2xHP equivalent. The secret to Devotion (and Martyr) is using Stoneskin, which reduces HP loss but does not lower the MP or HP restored.
Divine Veil – unless Yagrush is available, this can only be used by spending Divine Seal on a status removal spell such as Poisona or Paralyna. Interestingly, Divine Veil does not change who can be targeted by these spells (although Erase remains party-only) so if diligent White Mages keep track of other parties’ status effects, Divine Veil can come in handy for anyone in range.
Erase, Esuna, Sacrifice – Erase removes one negative magical effect from one party member, Esuna removes at least the same, and Sacrifice basically enables the use of Esuna. These spells are necessary for the healing of effects that otherwise cannot be fixed, such as Bio and Evasion Down. While Erase can remove any such debilitating status, Esuna will only heal an effect the caster is also afflicted by. Thus Sacrifice transferring effects from other party members to the White Mage allows for Esuna to then remove that from the rest of the party.
Casting Erase six times would take 108MP. Casting Sacrifice and Esuna would take 42MP. If Afflatus Solace is active, Sacrifice will siphon more than one effect, up to seven, and if Afflatus Misery is active then Esuna can remove up to two effects at once, making that MP go even further. The only weakness of Esuna is that it will not remove most status effects without Afflatus Misery, the stance which is not usually active.
Scholars started out as a relatively broken job, outshined by the other mages. Arguably they are still broken, but in a powerful way. With too many Job Abilities to handle and an accompanying slew of spells, these casters are called upon to apply spells to the party no-one else can dish out, in addition to their crowd-control duties.
Past level 70, Scholars can store up to four Stratagem charges, and get one back every minute. This allows for the continual use of powerful effects, especially the White Grimore’s Accession, which boosts the range of one healing or enhancing spell to the entire party.
Phalanx – a generally agreeable subjob for Scholar is RDM, which provides access to this powerful damage reduction spell in addition to native Sleep and Dispel. Because Scholar will be casting Phalanx while in Light Arts, their Enhancing Skill should be at least 285, resulting in 26 damage reduction, only two below a Red Mage’s cap for Phalanx II. And Scholar’s skill cap without merits is 293, providing 27 dmg down, or only one point less than a Red Mage’s party-targeted spell, and this affects the whole party at once for only 21MP.
Enspells – damage is currently calculated based on the caster’s Enhancing Skill, plus if the attacker has any relevant Enspell+ gear. This damage can be resisted, and usually is to some extent. It should not be cast if Stratagem charges are in short supply, or if another additional effect is more powerful, such as if players prefer to have a Samba active or if Soul Weapon is being used.
Stoneskin – much better than Summoner’s paltry 200HP, 92MP Earthen Ward, this should provide a 350HP buffer to the whole party for only 29MP. If any party members are wearing a Stone Gorget or Mufflers, they will get an additional 30 or 60 HP buffer, but these items only benefit the wearer. Even in the usual case of no-one wearing these items, one party-wide Stoneskin provides a bonus 2100HP, which equates to 72.4 HP/MP, the highest such ratio available in the game.
Storm Spells – this unique line provides the appropriate single weather effect to party members regardless of the current area weather. However, if the area weather is the same element as the Storm, then a double effect will be gained. This works best when party members have an appropriate Elemental Obi, increasing the weather spell boost change to 100%. Meriting Stormsurge means party members also gain a stat bonus corresponding to the element: Fire is STR, Ice is INT, etc. This starts at +3 and goes up to +7, which is considerable.
All the scrolls for Storm spells can be acquired from Professor Layton in the Eldieme Necropolis [S], where he is taking a break from his famous puzzle-solving adventures.
Dancers are not often included in FFXI activities for a number of reasons, most importantly their dependence on TP generation. While a boon in solo work, as a support job ability, and in lower level parties, having to hit a monster continually generally means the Dancer ends up damaging their friends more than helping them. Nevertheless, this job has three powerful abilities to consider having on your side, even if a main-job Dancer isn’t included. And it’s absolutely invaluable for Campaign parties, if those even exist.
Sambas – the third-tier makes fighting through WotG missions a breeze, since undead aren’t involved. During more relaxed events, a Soboro Samurai can throw on DNC as a sub, and keep up either tier-one Samba.
Waltzes – Converting TP into HP is another unique Dancer ability, and just like Sambas it can benefit only party members. While this limitation is one of Dancer’s serious flaws in high risk events, considering that in order to gain TP to cure, the enemy monsters have to be given TP which they use to damage the party, lower level players fighting for experience points usually attack monsters with weak TP moves. If those same monsters are weak to piercing attacks, including a Dancer could be the right decision, especially during off-peak hours when the familiar party jobs are not available.
Spectral Jig – with a recast of 30 seconds and a maximum duration of 90 seconds, this allows a Dancer to gain Sneak and Invisible without using items, without casting magic, and without dropping Invisible. Simply click off Sneak and re-apply. And it works well from a DNC subjob, at or above main job level 50.
How can a self-only ability benefit the whole party? Am I reaching too far here for the inclusion of Dancer? In any situation where the party is split up and moving around in a dangerous environment, the ability to self-sufficiently avoid aggro is crucial. Lamp floors in Nyzul Isle especially come to mind, or certain parts of Salvage, but the same is true for mission runs and getting to distant camps such as the far areas of Castle Oztroja [S].
Sometimes the little benefits go a long way, and Dancer is a job made up of small benefits.
Summoners may be more populous than Rangers (strange yet true) but they remain the red-headed stepchildren of FFXI.
With Summoner at 72, leveled the old fashioned way over a long, long time, I may or may not be qualified to write this job off as a loss for general party endeavors, but that’s my verdict based on experience and feedback. Six-Summoner parties can be a lot of fun for some NM fights, or messing around by the Moongate, if you enjoy that kind of thing, but for standard events the job is sadly lacking.
While Summoners can still do consistent damage to any mob for zero Enmity, gone are the days of requiring that tactic on Wyrms to succeed, not to mention ye olde Aerial Armor rotations. (Interesting how those zero Enmity blood pacts still work well on Odin, huh?) Even the separation of Rage and Ward was not really enough, because all casters are limited by MP and time to begin with. Restricted more than any other caster, SMN simply could not do any single task efficiently, and thus their role could be bettered by a combination of other jobs. Then Scholar took a nail gun to Summoner's coffin.
At least Summoner is the namesake of a great Final Fantasy cocktail invented by the folks at the IT University of Copenhagen.
This week's...
Most Valuable: Afflatus Solace adding Stoneskin to all Cures, for everyone, means it probably should have been included in the article on universal force multipliers. But then it wouldn’t have won this category over Dia III and Angon. Then again, Bar-ra spells and Sacrifice are party-only targeted.
Ignored Ability: If they can keep up initial TP generation and land Steps, Dancer’s No Foot Rise combined with Reverse Flourish can maintain quite a bit of TP and keep them running with less mob attacks generated.
Hazard Symbol: When Scholars run out of Stratagem charges, access to all those special powers goes away until the next minute mark. Watch out for which Addendum is needed when, so necessary spells aren’t removed from the casting list.
Overworked and Underpaid Job: Scholar has a lot to do, and just as many JAs as tasks. Without a lot of planning and practice at it can be too much to handle. Decide whether or not you want to use equipment swaps to skip animations, amongst other tricks.
Stupid Square Moment: Summoner’s Hastega still doesn’t overwrite Spider Web! But more seriously, capped melee skill levels are much lower than magic skills to begin with, and this lack of accuracy compounded with Dancer’s base Dagger ranking of B+ hinders the job. This severely hurts their ability to build TP and land Steps on high level enemies, not to mention problems with TP feeding when maintaining a Samba. Even a Corsair’s Loaded Deck won’t help Dancers recover from that bad deal.
Notes: Job population and merit popularity is sourced from the 9th Vana’diel Census at
http://www.playonline.com/ff11us/guide/development/census/09/4.html
We’ve taken a look at how many jobs can help everyone in the battle and also their own parties. But are you wondering about the percentage effects of Slow vs. Hojo? Interested in why Blind and Flash stack? Tired of not hearing about whether you should merit Sentinel or Rampart? Think all those guys are Paladrones and Ninjerks and they should let your SAM/DRG or RDM/BLU be in charge? Next week, we'll take a look at force multiplication for the tanks.
Until then, keep your graphing calculators handy!
Questions? Concerns? Did I take a logarithm when I should have used the antiderivative? Please leave a comment.


 #1 ~ Monk
 #2 ~ Samurai
 #3 ~ Ninja
 #4 ~ Dragoon
 Chaotic Pellucidity
 Teabags and KY Jelly
 The Bloggaru!
