Friday, February 29, 2008

Enough abbreviations to make your mind bleed, Part 4: Mo' Numbers, Mo' Problems.

Ok, so we are done with the numbers right? I freaking wish. But at least today, we will do something useful and practical with the numbers and we have some incredibly limited tests to see how this all works out. But first a recap, and no this recap involves no formulas. Just our high and low damage numbers. After all of that math and putting everything together, we know that our sexy Samurai should have this as there damage range:

Damage = 59~100
Now, lets stop for a second. Is that really the damage they should be hitting for? Or is it just another number that acts on something else?

Here is where I fail you, dear reader. I just don't know. That is part of the reason that I am trying all of this out. I need to know. So, what is the best way to see if these numbers work? Well, obviously it is to test them out! So take one sexy Samurai, one Greater Colibri, two WHM that are willing to help test and one bored DRG, and mix it all together. The outcome is not what you expect (luckily the unexpected outcome was not goblin-humping). Let's look at the results. Ugh! Raw data! LOL Anyway, I only tested 3 Greater Colibri. Yes, I know that is nowhere near enough to draw any conclusions, but it can provide insight into the damage formula. The testing conditions were very simple, Samurai/Warrior 75/37, only buff was Seigan and Third Eye, STR as listed before 98, Attack as listed before 422. No other buffs were place on me, and I never used food or job abilities. I did no weapon skills and did not include any critical hits in my results.

Houston, we have a problem. Here is where things break down. The damage formula that I have religiously followed for the last three days doesn't match the results I saw during the test. We should have seen results always land between 59 and 100, but in this test the results land between 63 and 112, and they could go further out as this was just the observed limits. Now, you are probably expecting me to step up at this point and say, "Haha! I know why it is doing this!" but I don't. I am going to blame my own limited understanding of the formula and maybe the fSTR formula. So, since we don't know what is going on, but we have some data to test, lets make a new testing formula. This equation is going to be actually useful (maybe) for figuring out not just this problem but the effect that changes in your set up will have on the range of damage you are doing. For this formula we are going to use the level 81 Greater Colibri because it is nice and simple and we know (or at least, we think we know) the stats for it. Ultimately, I am not looking for my exact damage against each possible mob, but rather, what kind of effects that STR and Attack have on my damage dealing possibilities. So lets look at the huge formula from yesterday and reduce the things we don't need.
Damage = (D + ((STR - VIT) + N)/2)/2 x (fMax(ATT/DEF - 0.050 x (mobLVL - playerLVL) ~ fMin(ATT/DEF - 0.050 x (monLVL - playerLVL))
can become
Damage = (D + ((STR - 67) + 4)/2)/2 x (1.2 x (ATT/322 - 0.3) ~ -0.5 + 1.2(ATT/322 - 0.3)
It may still look like a lot but it's not really. All you have to do is plug in STR and ATT and you should be able to come up with your new range. Just remember that if you change you ATT, you could end up changing you pDIF range equation. If you are increasing STR and ATT, it's not going to matter much because you are already in the highest bracket, but for the lower end it could effect it.

I think the problem with the results is that somehow I am screwing up the fSTR calculation. I just don't know for sure, and that is the area that people don't know that much about either, because it is so hard to test. Well, lets see what happens when we add one point of STR.
Damage = (75 + ((99 - 67) + 4)/2)/2 x (1.2 x (423/322 - 0.3) ~ -0.5 + 1.2(423/322 - 0.3)
(How did I know that 1 STR added one point of ATT? Well, I used this equation:
2 Handed Attack = {( 8 + Combat Skill + 3STR/4 + (+attack from gear) + (+attack trait/ability/minuet)) * berserk effect (if available)} * (1+ percentage increase from food )
I am not totally positive that is the correct adjustment for STR but, I am going to use it for now anyway) So that gives us a new range of 60-102. So we are moving in the right direction. The problem becomes that it is pretty difficult to shift these ranges without adding a whole lot of STR into the equation. And I am left scratching my head. Ahh, well. The best laid plans of mice and men. Either there is something wrong with my equations, or there is something wrong with other people's equations. If you leave the fSTR factor as fSTR2 you come up with results that are much closer to what they should be (with a range of 65 to 111) but it still does not line up. I am going to ask around and see what I can come up with.

After four days of this, my brain is absolute sludge. I currently have open in my Firefox tabs: 2 work tabs, 2 blogger tabs, 1 BG forums tab, 1 e-mail tab, 1 graphing website tab, 1 regular wiki tab and 1 god damn melt my fucking brain graphic calculator tab. This is too much! LOL

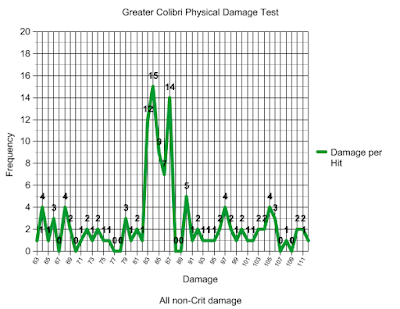
Anyway, lets see what my other testing came up with? This is the frequency of the damage per hit during my really short test: Ok, I am going to include some things that you should take into consideration even though they may hurt your brain. The average was 86.5625, the median was 85, and the mode was 84. Now, you should know what an average is, so I am not going to explain that. The median is the number that is exactly in the middle of a set of numbers. The mode is the number that occurs most often. You can use this to help you understand what is happening when you do damage. Here is that same data now graphed out. Again, the distribution is not what I expected. For this though the sample size is too small so I am not sure if this is exact, or if it should be taken with a grain of salt. Also there is another consideration which is the strength of the random number generator that SE uses. I am not sure how good it is, but the results are kind of weird. Normally, I believe in this case, SE is going to basically want to start with an algorithm that is going to makes a bell curve (or a normal distribution) whose outside parameters are defined by what we have seen before. If I am wrong about this, then a lot of the things I think about how damage is done behind the scenes might be wrong. The problem is that if they didn't use some kind of curve shaped algorithm then we would end up with an even distribution of damage across the range and, at least I am sure about this one, that is not the case.
If you haven't been reading for the last three days, this is the place to start. I am going to start making suggestions now about how you should approach STR and Attack in the game.

So operating on what I believe is the sound assumption that SE is using some kind of curve to determine damage, lets look at some of the possibilities. But first a diagram of what an imaginary damage curve would look like: This just shows how a normal distribution would work. It is a representation, not a real depiction of SE's random number generator. Basically the idea is that you are more likely to hit for amount in the middle if no other factors are at work on the damage. Actually, this baseline could be anything because it is just a measure against other tests. Well, I think there could be problems if you do start with too many conditions because it will create a skew in the data before you even begin. But for determining your damage, you can use it as a logical representative starting point.

Now, lets have some fun. This whole discussion was created in my mind to try to understand how STR and Attack interrelate, and what you should do in different cases. Lets look at fSTR first, because that is in the first part of the equation. This one is pretty simple to understand, as fSTR increases the curve increases. Meaning that fSTR increases damage all throughout the range of damage. Now, remember the equation for fSTR is
fSTR = ((dSTR + 4)/2)/2
and since it is divide by two twice, it means that for every point you increase in STR you only get a .25 increase in fSTR. Further, since these numbers are all rounded down, for each point of fSTR you want to gain you will need to get to the next full point, so it can take up to 4 points of STR to increase your fSTR by 1 point. (This is true if the equations for fSTR are correct, if they are not then I have just wasted 4 days on this LOL) So depending on how close you are to your next fSTR point increasing STR over Attack may be a bad idea. But remember! Increasing fSTR by 1 point will have a much larger impact on your damage than increasing Attack by the same amount. Think of it this way, if you can not get to the next fSTR then Attack will always be better, because increasing your STR will literally do nothing besides increase your attack.

Now, lets go over attack. There are basically two scenarios under which Attack can increase your damage. This is the first one, which I believe is incorrect, and I will explain why in just a sec. Now if you look at this graph it would seem reasonable, because all attack does is shift up the amount of damage each swing can do, but it doesn't change your damage range. The problem with this design is two fold. First, it would be hard to do as it would require constantly adjusting the random number generation with information for each character. Let me stop there, because I don't know if that is hard to do at all. Just in my little wee brain it seems harder than the equation we already have. Second, it would really reduce the effect of attack by a lot. Notice that the extreme ends are still there with their massive drop offs and though the area over which damage is shrunken and improved, the frequency with which all occurrences has no changed. This would have a very limited effect on damage over all. That is why I believe that a scenario something like this is what really happens: In this scenario, the effect that Attack has is to increase the number of times that a higher end result will occur. The more Attack the more times you will hit for a higher Attack number. But this scenario is also wrong, because Attack does not have a cap on it, while fSTR does. So it is usually said under the fSTR cap that comparable amounts of Attack and STR favor STR, but after the fSTR cap Attack will have a larger effect on damage than STR because STR will only be increasing damage through Attack. The effect you see pictured above could happen when you are adding Attack below the fSTR cap, but there would still be a curvature that I did not show. Honestly, after days of this it's hard to even wrap my mind around it. LOL

Ultimately, the thing to remember is this, if you can determine how much STR will get you to the next fSTR point, you can better evaluate if you should use more Attack or STR. There is more to discuss here, but I am done for the day and the week on the subject. On Monday, I will talk about more practical applications, and hopefully I will have an answer to the question of what the hell STR and Attack do to the damage curve and what it would look like!

Honestly, I am surprised my brain made it this far.

I have other business that I will cover quickly, but since I skipped it, I should cover it before the weekend. First, I got to tank Armored Chariot, wee! This fight is pretty damn easy, it is just getting to the top that is the hard part. Both Zhayolm and Arrapago have pain in the ass final floors to get to easier bosses. With Versus we did a Zhayolm run which though didn't drop any 35's, but we did get Skur a pair of 15 hands for completing his Morrigan's Cuffs from the first floor frog, then we cleaned out the rest of the frogs up to the 6th floor. Doing the frogs is actually pretty easy, and with practice and good frog selection we should be able to add the boss. Blaize apparently isn't very attached to his THF AF.
See you on Monday, hopefully the bleeding will have stopped.

Wednesday, February 27, 2008

Enough abbreviations to make your mind bleed, Part 3: Becoming Dar Master in the Klingon Empire.

Thank god I have this to work on, because if I didn't I would have to spend this entire blog post about the fact that we got another lame info post about the update. Maddening it is. But I have my little refuge, my opus, my endless babbling and this will be my shelter from the string of completely useless info posts.

We are getting closer and closer to completely understanding the damage formula in FFXI, and if you thought that the last two days were esoteric then today is going to send you for a loop. But before the mind melting begins lets look at what we did yesterday.

cRatio = ATT/DEF - 0.050 x (mobLVL - playerLVL)
This is the equation that you use to factor your attack and the mob's defense into the damage that you do. Now, this would be really simple if we just left it here, but it would also mean that you would always hit for the same amount of damage, and that would be pretty lame. LOL So, we are going to get to another place where we are going to have upper and lower limits of damage. Unlike fSTR and other limiters up until this point that have just dictated that the result of the formula has to be limited within a range, these limits will actually provide the outlying limits for a variable that is inserted into the equation to randomize damage results.

That sounded a little bit dry and technical, to put it more simply: the next thing we are going to look at are the highest damage and lowest damage that you can possibly get. Now, back to the complicated part. Time for more charts! This first one is the way that you determine what the maximum amount of damage you can do. The maximum can change depending on your cRatio (remember, it means your level corrected attack/defense ratio) but for the most part on XP mobs you are going to be in the highest bracket (the 5/6 (.83~).

cRatio RangeFunction Value
0 ≤ cRatio ≤ 0.5fMax(cRatio) = 0.4 + 1.2 x cRatio
0.5 ≤ cRatio ≤ 5/6 (.83~)fMin(cRatio) = 1
5/6 (.83~) ≤ cRatio ≤ 2fMax(cRatio) = 1.2 x cRatio


Now remember this is just the highest possible damage you can get on a normal melee attack. We need another chart to figure out the minimum amount of damage that we can do on one normal melee attack so we can get the range in which any normal melee attack can land.

cRatio RangeFunction Value
0 ≤ cRatio ≤ 1.25fMin(cRatio) = -0.5 + 1.2 x cRatio
1.25 ≤ cRatio ≤ 1.5fMin(cRatio) = 1
1.5 ≤ cRatio ≤ 2fMin(cRatio) = -0.8 + 1.2 x cRatio

Ok, so now we have some pretty sweet looking charts, but what the fuck do they mean, right? Ok, lets start with f~ thingees. fMax(cRatio) and fMin(cRatio) just means that these are the maximum and minimum of the functions that determine your damage, and that means that they are just the neat little notation that we use to say this is the most damage you can do and this is the least damage you can do! Kind of like how cRatio has a maximum amount, when the minimum is determined by the game to be below 0 it will be rounded up to 0. I think this is just so that gimp players would start giving the mob HP with their weak swings. LOL

Now, lets take the cRatio that we got yesterday from the "sexy Samurai slaughters the Greater Colibri" scenario.
cRatio = 422/322 - 0.050 x (81-75) = 1.310 - 0.3 = 1.01
With this information we can stare at those charts I posted above and become even further confused. LOL Since we know that our cRatio is 1.01 we can pick out the fMax(cRatio) and fMin(cRatio) for our scenario. 1.01 falls between 5/6 (.83~) <>fMax(cRatio) = 1.2 x cRatio For the minimum, since 1.01 falls between 0 ≤ cRatio <>fMin(cRatio) = -0.5 + 1.2 x cRatio So, we have a fMax(cRatio) of 1.212 and we have a fMin(cRatio) of .712, and what does that mean? Remember pDIF? Well, pDIF is the number that lands between those two numbers. The fMax(cRatio) and the fMin(cRatio) were the ways that we figured out how high and how low your pDIF can reach. In the end this is what pDIF kind of ends up looking like:
pDIF = (fMax(ATT/DEF - 0.050 x (mobLVL - playerLVL) ~ fMin(ATT/DEF - 0.050 x (monLVL - playerLVL))
The problem is that fMax and fMin use different calculations when the cRatio changes. ; ; That is hard to illustrate in a single equation, but I will deal with that in a little bit.

And thats it. o.o; No, really, thats everything we need to know to put together the entire damage formula. So, lets walk through this one more time. From the beginning we have the physical damage formula:
Damage = Base Damage x pDIF
and since we know the formulas for Base Damage lets go ahead and plug that in there!
Damage = (D + (dSTR + N)/2) x pDIF
Now, notice that I haven't actually had an equation that involves pDIF yet, but actually I have! I haven't tricked you, but I should definitely explain this now. pDIF is actually the representation of all the numbers that can fall between your fMax(cRatio) and your fMin(cRatio) so by finding those two numbers we actually know our pDIF! But knowing that doesn't make completing the equation any easier, in fact it really makes things a much larger pain in the butt. Just before I do that, I am going to change the equation slightly so that it better represents each of the individual stats that we are going to need to get an actual number out of the formula. The formula should look like this now:
Damage = (D + (dSTR + N)/2)/2 x (fMax(ATT/DEF - 0.050 x (mobLVL - playerLVL) ~ fMin(ATT/DEF - 0.050 x (monLVL - playerLVL))
And thats just a nice representation of what happens, but as you already know, the pDIF can change based upon changes in the cRatio, so lets go a bit further and make specific equations for all of the potential cRatio outcomes. This should be fun.

For cRatio between 0 and .5 our equation looks like this:
Damage = (D + (dSTR + N)/2)/2 x (0.4 + 1.2 x (ATT/DEF - 0.050 x (mobLVL - playerLVL) ~ -0.5 + 1.2 x (ATT/DEF - 0.050 x (monLVL - playerLVL))
Between .5 and .83~:
Damage = (D + (dSTR + N)/2)/2 x ((ATT/DEF - 0.050 x (mobLVL - playerLVL) ~ -0.5 + 1.2 x (ATT/DEF - 0.050 x (monLVL - playerLVL))
Between .83~ and 1.25:
Damage = (D + (dSTR + N)/2)/2 x (1.2 x (ATT/DEF - 0.050 x (mobLVL - playerLVL) ~ -0.5 + 1.2 x (ATT/DEF - 0.050 x (monLVL - playerLVL))
Between 1.25 and 1.5:
Damage = (D + (dSTR + N)/2)/2 x (1.2 x (ATT/DEF - 0.050 x (mobLVL - playerLVL) ~ (ATT/DEF - 0.050 x (monLVL - playerLVL))
And finally between 1.5 and 2:
Damage = (D + (dSTR + N)/2)/2 x (1.2 x (ATT/DEF - 0.050 x (mobLVL - playerLVL) ~ -0.8 + 1.2(ATT/DEF - 0.050 x (monLVL - playerLVL))
Now, I know that is a lot, but its actually pretty helpful. We can now see what parts of the equation you can know and what is determined by the random number generator that is built into the game.

I am adding in something new pretty late in the game but hey, its not that complicated. For the Damage equation in the next part I have I just changed dSTR to (STR - VIT), and if that is going to throw you off then you should have given up on Tuesday. The only reason that I did that was because it makes it easier for listing out all of the components of the equation. I also should mention this point that I also corrected something else that really was kind of an error from Tuesday. At one point on Tuesday's entry I listed the equation for fSTR2 incorrectly and I had just left it as fSTR, so I have adjusted that page. This page is accurate. Anyway, like I said this is a learning process for me too, so you have to accept things like that are going to happen.

Anyway, with the small adjustment to the change of dSTR into (STR - VIT) our final formula looks like this:
Damage = (D + ((STR - VIT) + N)/2)/2 x (fMax(ATT/DEF - 0.050 x (mobLVL - playerLVL) ~ fMin(ATT/DEF - 0.050 x (monLVL - playerLVL))
So now lets apply this to a practical situation, how about our sexy Samurai? Indeed! The very first thing that we need to know is the cRatio because that determines which equation we need to use, and since we are going to list that anyway, lets go ahead and list out all of the values that we already know.
  • D = 75 (Hagun's Damage)
  • STR = 98
  • VIT = 67
  • ATT = 422
  • DEF = 322
  • mobLVL = 81
  • playerLVL = 75
Now, from this we can figure out the rest of what we need to know! Lets go for it!
Damage = 75 + ((98 - 67) + 4)/2)/2 x (1.2 x (422/322 - 0.050 x (81 - 75) ~ -0.5 + 1.2 x (422/322 - 0.050 x (81 - 75))

Now since this is a range, and ultimately we are looking for the outliers to find out what our range is, I am going to break this into two equations. First, the high end:
Damage = 75 + ((98 - 67) + 4)/2)/2 x (1.2 x (422/322 - 0.050 x (81 - 75))) = 83 x 1.212 = 100.596
And for the low end:
Damage = 75 + ((98 - 67) + 4)/2)/2 x (-0.5 + 1.2 x (422/322 - 0.050 x (81 - 75))) = 83 x .712 = 59.096


Finally! We have something to work with, or do we? Sure that is the range, but what is it the range of? And what does all this mean? Well, that is what tomorrow is for!

Tuesday, February 26, 2008

Enough abbreviations to make your mind bleed, part 2: the nerdination!

I have heard several people so far level a very legitimate criticism of yesterdays post. They said that its too much and to them the information is too in-depth and they will just do what they are going to do, and also that they weren't going to read this. In response to this I have three thoughts, first I do hope that there are people out there that do enjoy this level of detail and they will be able to draw insight from a more layman's description of the damage formula. Second, for those that feel this is too much, I do plan on adding some explanations at the end on how people can use the information in practical situations. Finally, I am not just doing this for you, I am also doing it for my own edification. It is the nature of blogging, but in essence writing all of this out is making it much more comprehensible to me. So even if I am the only one that learns from these explanations then I have achieved something.

Now, back to the show.

Yesterday, we left off with only the first half of the damage equation completed. Lets take a moment to go over what the equation looks like at this point:

Damage = Base Damage x pDIF
becomes
Damage = (D + (dSTR + N)/2) x pDIF
Now, remember that these numbers are limited on the high and low end not at just at the dSTR level, but also at the fSTR level, I didn't add that to the equation because writing that into the equations would require like Sigmas and functions and other crap that I don't know how to notate. LOL Now it is time for pDIF.

Lets start with what pDIF means and what it represents. pDIF has several difference components but essentially it boils do to a calculation that takes the player's Attack and subtracts it from the monster's Defense, then a level correction is applied, finally SE inserts a random factor that causes the variance in damage that you see in the game. Knowing that, lets take a look at the actual pDIF formula and I will describe the different portions of the equation. Actually, lets not, because the pDIF isn't really so much an equation, but an algorithm that has a modification place upon it. Since we don't really care about (or actually, we can't really do anything about) the algorithm that SE uses in this part, what we want to look at is the modification that is applied to the algorithm. That modification is:
cRatio = Ratio - 0.050 x level difference
Ratio is simply your Attack divided by the Defense of the monster you are trying to kill. This is different than the simple subtraction that happens in the fSTR formula for the comparison between player STR and mob VIT.
Ratio = ATT/DEF
In this case, for simplicity I have adapted ATT to mean the player's Attack and DEF for the monster's Defense. Level difference is again pretty simple, it is just the monster's level minus the player's level. So the complete equation would look like this:
cRatio = ATT/DEF - 0.050 x (mobLVL - playerLVL)
Now let us recall from yesterday our sexy Samurai scenario, here is a picture in case you had forgotten! Our sexy Samurai has an Attack value of 422, and from the previous mentioned research that others have done we know that the Defense value for a level 81 Greater Colibri is 322. With this information we can determine cRatio (I believe this stands for corrected Ratio because it is a ratio that is "corrected" by the level difference).
cRatio = 422/322 - 0.050 x (81-75) = 1.310 - 0.3 = 1.01
Well, it's much later than I had hoped so I am going to leave off here for today. The next part involves ranges and randomness and I need to leave more time for it anyway. Hopefully, I can finish this up tomorrow!

Enough abbreviations to make your mind bleed.

Ok, this is going to be an endeavor into the unknown. As a little back ground let me give you my educational history in mathematics. In high school, I took Calculus AB, but that is a bit of a misrepresentation, because I got a 1 on the AP exam. My writing skills obviously surpassed my mathematical skills and as such I put some serious consideration into the idea of writing an essay as to why they should not give me a 1 on the AP exam. It probably would have been time better spent over the constant scratching and erasing. But even considering this, in college I attempted Calculus again, but I had learned my lesson from high school and dropped it after the second class. Why not the first, you ask? Because in the first the professor only took attendance and handed out the syllabus which I stared at blankly and deluded myself for two more days before walking out of class the second day probably understanding less about Calculus than when I had gone in. I then proceeded to realize that since math was barely a requirement for my degree, I could aim just a bit lower for my achievements on that side of the curriculum. I ended up in a class where the most complex problem involved drawing pretty lines through points to get efficient paths. I believe I had done equivalent work in the 4th grade; Home Ec would have had more difficult fraction problems. Anyway, why do I ramble on about this? Because today's experiment in mass confusion requires some level of Calculus (or at least at least what I understand about Calculus). I am pretty sure that Calculus has something to do with curves and areas under them, and since that is essentially how damage is determined in the game, I am going to call it Calculus. The people that understand these formulas would probably call it other things, like easy and simple and you-have-to-be-one-of-Potpressure's-clients-to-not-understand-this
-you-simple-minded-twit. What is the reason I believe I have any hope with this undertaking? Well, Calculus is just essentially just Algebra with formulas, and Algebra is essentially just regular math with letters instead of numbers, and regular math is just like playing with numbers, and playing with numbers is like playing with blocks, and I used to love playing with blocks in pre-school. So, by transitive property, I am basically Albert Einstein. >.>

Since there is no really good way to start this, might as well dive in. First, you need to understand that people far more intelligent and capable in mathematics came up with all the equations for melee damage in the game. VZX has posted all of these on his rather amazing website and also posted the information of the FFXI wiki which starts here and the rest of the links can be followed from that page. Now, lets take the first, most basic and most important equation: the normal melee attack (if you want to know another kind of attack you are going to have to wait for it, because this shit is complicated enough as it is).

Damage = Base Damage x pDIF
Isn't that sweet? Damage = a bunch of words and letters all multiplied together! And don't think for a second that Base Damage means the damage that is listed on your weapon... well thats part of it but there is so much more. So lets start there, because pDIF is going to take forever for me to explain.

Base Damage is more like "Base Damage" in that it is actually a term that together has a specific meaning. In this case, it stands for another equation.
Base Damage = D + fSTR
(It's actually fSTR2/2, but I will get to that later) Alright, so what does that mean? Well, we can't figure out what the equation means until we start defining what those letters actually mean. Lets start with D because that is the easiest. D is the Weapon Base Damage or in other words the listed damage of the weapon. Pretty easy, right? Well that is where the easiness ends, and the ZOMG-my-brain-is-melting starts.

I am going to start using an example at this point because if I do not then a lot of this is going to turn into an esoteric number crunch and it might be too abstract to think of the practical applications of these formulas. So for our example, lets start with a rather sexy player, and lets make him a Samurai. Like any good non-relic-having Samurai, our hero is using a Hagun which has a D of 75. This sexy Samurai is going to need a monster to test out these forumlas. For our example, lets make our test subject everyone's favorite: Greater Colibri. For the rest of the equation I will be using statistics that are constant for all Greater Colibri of the same level, but remember that levels of mobs vary and I am not trying to create an iron law for how much damage you should be doing, rather I am trying to figure out how these equations work and how I can make them useful for me.

Currently we know what D is and thats it. So lets move onto the next part of the equation: fSTR. fSTR is a function, which basically means that it is a formula that you can plug numbers into and it will spit you out a new number in return. This is where some of the variation begins; the exact numbers for part of this equation are not known or have some kind of variable determined by the game which is added into the formula probably in the form of an algorithm. That may have sounded smart, but really I have no idea why there is variation, I just know that there is and that the truly smart people have been able to approximate it. In this case fSTR is basically creating a number that will be added to D (the weapon's base damage) to create a multiplier used in the real damage equation. Basically, fSTR is modifier that takes into account the difference between your STR (in this case our sexy Samurai) and the monsters VIT (our poor unsuspecting Greater Colibri). It would be really nice if it was simply just your STR - monster VIT, but of course it is not. Before we even get to the function, let me tell you that fSTR has a cap on the low end and a cap on the high end. This is just part of the equation and it limits your maximum and minimum modification from fSTR. These limits are determined by another two new equations. The lower end is limited to:
-(Weapon Rank)
and the upper end is limited to:
(Weapon Rank + 8)
You probably know where this is going, we don't know what Weapon Rank is yet, so lets figure that out with, you guessed it, another equation!
floor(Weapon Damage Rating/9)
Now don't be scared by "floor," it is just a word that helps you figure out what to do with any decimals in an equation. In this case, floor means that we always round down and get rid of any decimals that might appear in that equation. So now that we have an equation that we can actually plug some numbers into and get some real answers we can start moving back toward our goal of finding out the fSTR for our sexy Samurai with a Hagun.
Weapon Rank = floor(75/9) = floor(8.3~) = 8
So our Weapon Rank is 8, and using this we can determine the lower and upper limit for fSTR.
Lower fSTR limit = -8
and
Upper fSTR limit = (8 + 8) = 16
With this information we are able to start talking about fSTR itself. It's kind of weird to know what the outside limits of fSTR are without knowing much about the equation itself, but we need to know it to get the proper numbers. This is where the first major variable is added into the equation, but essentially it looks like this:
fSTR2 = (dSTR + N)/2
dSTR is the direct difference between the attackers STR and the attackee's VIT, so that part is easy and it is also the first time that any statistics of the monster comes into play. N is a number that changes depending on the dSTR value. This is a little tricky, but it basically means that increasing your dSTR will have the effect of decreasing your N which is then factored back into dSTR. o.o; Mathematical dependencies make my mind do backflips. But the effect that it actually has is to keep your fSTR down as your dSTR increases. This is probably to keep the results reasonable and prevent damage from falling too far against mobs with very hit VIT. I am just going to give you the chart that approximates the values for fSTR because I believe this is just from empirical testing and not from any given knowledge.

dSTR RangefSTR2 Approximation
12 or greater(dSTR + 4) / 2
6 to 11(dSTR + 6) / 2
1 to 5(dSTR + 7) / 2
-2 to 0(dSTR + 8) / 2
-7 to -3(dSTR + 9) / 2
-15 to -8(dSTR + 10) / 2
-21 to -16(dSTR + 12) / 2
-22 or less(dSTR + 13) / 2

Now that we have this information we can do a whole lot more to add to the equation we have built so far, but before we do that we need to know the values for our sexy Samurai scenario. To find dSTR we will need to know the Samurai's STR and the Greater Colibri's VIT. Lets take a look at our Samurai's STR first, and since our Samurai is a sexy Samurai they have to be Elvaan, and since our Samurai is a smart Samurai they are subbing Warrior (don't even get me started on the how gimp /NIN is for XP), and since our Samurai is not a gimp Samurai they have 5 STR merits. Base STR for a SAM/WAR at 75 is 75, adding in the 5 from merits gives sexy Samurai a total of 80. Now for their TP equipment:
HagunClaymore GripNothingTiphia Sting
Walahra TurbanChivalrous Chain (STR +3)Brutal EarringMerman's Earring
Haubergeon +1
(STR +6)
Dusk GlovesRajas Ring (STR +5)Ulthalam's Ring
Amemet Mantle +1 (STR +2)Swift BeltByakko's HaidateHachiman Sune-ate (STR +2)

That is another 18 STR for an adjusted total of 98. Now we just need to know the stats for a Greater Colibri. Luckily some very dedicated people have done the research and have figured out the VIT of a Greater Colibri of level 81 which is 67. We are almost ready to figure out fSTR but like fSTR, dSTR also has upper and lower limits:
Lower dSTR limit = -((7 + Weapon Rank x2)x2) = -((7 + 8 x 2)x2) = -46
and
Upper dSTR limit = (14 + weapon rank x2)x2 = (14 + 8 x 2)x2) = 88
These numbers are pretty far from any regular experience so they are more academic, but still important to know.

Now lets figure out fSTR! Since we know that 98 - 67 is going to be way over 12, we can figure out which equation we should use to get our approximate fSTR2. Thus:
fSTR2 = (dSTR + 4)/2 = (31 + 4)/2 = 17.5
Now, remember this is fSTR2 not fSTR, so we still need to divide it again to get the real amount, which would be 8 if I am doing the rounding correctly. I am not sure if I am rounding correctly, but again since this is an approximation I believe it can be anywhere around this. I do not know if the approximation is because of rounding or if it is because of some other variable. I think that the reason the variance occurs may be caused by the fact that the number for fSTR2 can be either 17 or 18 but I could be completely wrong. LOL The important thing is that we now have an approximate fSTR number. It should be noted that because of the way the equation works (with two divisions by 2) it takes between 4 and 6 more STR to be able to increase your fSTR by 1. This is just one of those general rules that is good to keep in mind, but remember that it could be 1 STR that increases it depending on your current STR and that it may not always increase your fSTR because of the range of the approximation. Another general rule to keep in mind is that for two-handed weapons it is almost impossible to hit the cap for fSTR but it is much easier to do with a single-handed weapon so keep that in mind when you are finding your fSTR.

So now we know everything we need to get a value for Base Damage!
Base Damage = D + fSTR = 75 + ~8 = ~83
and that gives us the first half of the melee damage equation, which is a multiplier on your pDIF. And that is what we are going to talk about tomorrow. This may seem complicated, but if you understand the equations, the reason they work and how they work you can use them in wonderful ways, and may even discover some thing to improve your own set up!

Tomorrow I will continue the explanation of the other half of the equation, pDIF. I will also go over how to make adjustments, and what different adjustments will do, and graph it out for everyone.

If you have any questions, please post them! It will definitely help me when going over this, and hopefully I will have a decent explanation for why there is a variable in fSTR, because that is bothering me! LOL

Monday, February 25, 2008

Higher Education.

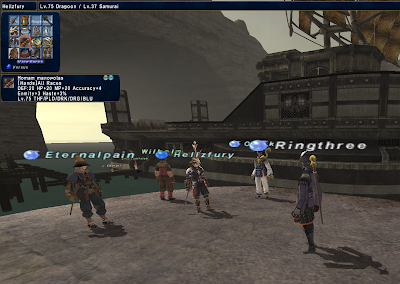
Grrr... I have spent too much time doing actual work today and responding to Kaeko's AV strategy (an interesting idea, but it has several problems in theory and practice) and I have not left myself as much time as I wanted to leave for this post. So lets see what I can get done for today. Just so you know, I was away all weekend so I am going to cover in-game stuff quickly. On Thursday we did another Omega, and we had a few more people so we tested our holding strategy which netted us one Smalt Chip (the easiest zone to do and for us, the most common Gun Pod drop) and a bunch of coins. The drops were feet and hands. The feet went to Eternalpain, pictured below as a BLM. LOL The hands when to Hellz and complete his haste set up on his DRG. :) Also, I managed to get my BLM to 25 in a very good party before I had to leave for the weekend. This clears the way for me to get to at least 51, where I wanted to be and the gear that I wanted to wear.
Sorry about today, but tomorrow, I will have fun, excitement and math! I am going to try to use math to help to explain to myself and you (if you can follow my confusion ramble) how attack and STR relate to damage, how they interact, and possibly how my understanding of what equipment I should be using is flawed! Wee!

Wednesday, February 20, 2008

I have... a stalker? o.o;

Long story short, just be glad that I didn't post yesterday's post, which I would have had the internet connection for my office had gone down yesterday right before I was going to post it. I had forgotten to send myself yesterday's pictures and who wants a blog without pictures. I have the pictures now, and they are integrated into what I got accomplished yesterday, plus today's stunning revelation... I have a stalker. Yeah... First question that came to mind, why stalk me? I am a middling player with a middling blog (even though I have a flare for self-promotion), but this goes deeper than that I think. Evilringthree has been around for a while, has sent me and friends tells in game, isn't connected to any character on my friends list, and now, apparently, has a blog. There sole purpose appears to be to stalk me and eventually replace me with themselves as they are my evil doppleganger. I am not kidding. I wish I was, but I am just not clever enough to come up with this: You are your fucking O's kote. Apparently, I forgot to mention that Evilringthree plans on torturing me too. I am going to go ahead and say that, while this may help in the promotion of my blog, the stalking, torturing and eventual replacement the evil version of myself isn't such a great development. Where this all is heading I do not know, and since I seem to be the only person in the world that is capable of maintaining a blog on any kind of regular basis it will all probably disappear before too long.

ANYWAY...

On with the show.

Ah well, lets see, yesterday when this blog was written and before the collapse of the entire interweb surrounding my workplace this information was fresh and new, well, now it's one day stale, but you can stick in some onion soup cover it with melty cheese and have it for lunch. I was going to call this post something like "Just chillin' over here in the corner..." because thats what all the screenshots appear like... for example lets take the first thing I did two days ago: I was late getting home because of a meeting and I missed sky but I did help with Bastok Rank 10 for Rygar which definitely was cool to do again after so long. And it appears that I am uncomfortably waiting in the corner, just chillin', waiting for Zeid and Volker to finish their little heart-to-heart.

After the mission, I did an Arrapago Remnants run with the other Salvage group. I really think that these runs with this other group is going to help us a lot. They move so much more quickly than we do in general. We have far too much waiting around for instructions and chest checking, and if we eliminate that I think we will move much more quickly. I am also going to draw from their play book in Arrapago. I actually think that we under farm the first floor in Arrapago now, because getting a few extra cells on the first floor is really helpful later in the run. For example, it makes the second floor QQA much easier to kill and it makes it much easier to clear a path to do the third floor QQTH. I am really excited about doing Arrapago again with Versus because I think we will be able to really zoom through it. On this run we were able to kill the mobs on the 6th floor in the requisite 7 minutes to get the two QQTH's to spawn. I don't see why we would have any problem doing this either. I do have to say that we did get rather lucky on cell drops on the first two floors, so that did help later on, but earlier planning definitely helped in making this a reality. I also like the way that they divvy up the mages responsibilities in crunch time situations. I think our mages have been trained to be successful at open world situations, because that is what we do for a majority of our events. This can lead to over-curing because in general in those situations it is more critical to keep the tank at full HP because of potential large damage moves. In Salvage, especially on bosses, it is easier to have just one mage per tank which massively saves on MP for the fight.

Anyway, nothing dropped from the NM's we did and "we" (parentheses because I was the third MNK on the run and didn't get much gear at all considering it was Arrapago) fought Armored Chariot, which went very, very well, but we timed out at about 35%. I would say that we were at about 8 minutes, maybe a little more when we zoned up. I have yet to fight Armored Chariot so I can't say how easy or hard it is supposed to be but I can say that only one person died on it with just a WHM, RDM and BRD healing and it was the person that was being healed by the BRD, so not that surprising. I can also say that we would almost definitely have beaten it given just a couple more minutes. I didn't have much gear at all but I still could have stepped in if someone else had gone down, and though the mages we getting low on MP, they were still managing. Now, I have to say that I am learning a lot from this group, but it is not like I haven't been doing Salvage for a long time, so the "learn" is not like "Hey, I need to go this way" or "Hey, we should kill this mob differently". That is stuff I already know. Hell, I even did most of the write-ups for the BG Wiki for Salvage (just need to finish the Zhayolm Remnants one), so it's not like I don't understand the concept. What I am learning about are the tweaks that will make our own runs better. For example, I think we have been really under farming the first floor as I mentioned before, and that with more time spent there the rest of the run will go more quickly. The second thing I think I have drawn from this is that I need to spread out the duties for these runs a lot more, starting with teaching Ashhhhh how to pull for all of our runs. Ashhhhh is a really good BRD and I think he is totally capable and will fill the roll well. Another thing is that I need to guide the pace for each remnant we are in and what our goal is going to be. I feel like I am always rushing, but there are places where killing a few extra mobs and opening space will help a lot more than just trying to get to the next floor. I think that I need to insist to our mages that buffs earlier on are one of the most important things that the DD can have, that means having haste on all of the DD's in at the the main party, and not worrying so much about keeping everyone healed all the time in the second party. This is how we do things outside of Salvage, the DD's know that if they are getting banged up on Omega, they have to pull back and take a knee because no one is going to heal them. It's time to adapt that to Salvage. My last thought on this is that I am torn on insisting that people have certain merits and merit abilities. I don't like dictating to people on what they should and should not merit (well, I do sometimes in my own head LOL), but there are some merits that really are crucial for Salvage. Angon and Feint are two melee merits that come to mind first. Angon is a minute worth of stackable 20% defense reduction for a minute every three minutes. Feint is even stronger with a 50% evasion reduction for 30 seconds. Having these two merit abilities is critical to a quick QQA kill especially on the second floor. For BRD, Troubadour is important for the 6th floor where you have to kill really fast. Then there are the RDM tier 2 spells which all RDM's already know about.

That's it no more Salvage for today or I will ramble endlessly about it. Well, ok, one last thing. Omoikitte has totally reworked the Versus website as I have already mentioned but specifically she made a new page for Salvage gear. I love the effects of this page, check it out.

Now, about my SAM. Well, last night I finally popped those 5 extra merits I had lying around into Meditate Recast. That leaves me with 9 merit points left to earn to completely cap my SAM merits. Honestly, I don't know what took me so long to get MNK and SAM capped, well, at least for SAM, because MNK was my last job to 75 so I can see needing them there, but I think it was just recently that I decided to start focusing more, and now I feel good about my choices. I am going to get 1 in each of the last three categories for tier 2: Ikishoten, Shikikoyo and Blade Bash. Blade Bash is now a reliable stun, Shikikoyo might be helpful when prepping for events and Ikishoten, well, I am going to get that because it's not really that great but reducing 15 minute recasts even to 10 minutes doesn't really do much for me. I will only use them in special cases I have no doubts, so no reason to have them up faster. Now, my SAM just isn't as well equipped as my MNK which is a little saddening but it also doesn't have the easy and apparent best gear for each slot that MNK has either.

For TP:
Hagun
Tiphia Sting
Walahra Turban
Chivalrous Chain
Merman's Earring
Brutal Earring
Haubergeon +1
Dusk Gloves
Rajas Ring
Ulthalam's Ring
Amemet Mantle +1 (Charger Mantle?)
Swift Belt
Byakko's Haidate
Hachiman Sune-ate

As you can see there are plenty of places that I can improve, but I have to use this set up to get to 6-hits. If the stupid bees every drop my feet, I will be able to us Usukane Sune-ate and that will change a whole lot of things. I will be able to get rid of the Chivalrous Chain as the first and most obvious improvement, and I will switch over to the Peacock Charm for TP build, maybe a Justice Torque if they existed. There are other obvious places that I can really improve like an Ace's Helm would help infinitely, or even Askar would be nice. I don't really know right now if the Amemet Mantle +1 is better than Charger Mantle, and that is a bunch of math that I can't wrap my head around. Finally, it looks like we will be able to do a Divine Might soon, so I will be switching up my Suppanomimi for a Bushinomimi and that will fix my gimp ear slot.

I wish I had a better understanding of how Attack and STR were calculated so that I was better at determining which pieces were better. And I am trying to teach myself, and if you want to know more, I will be going over that tomorrow, with neat graphs and stuff.

Anyway, to wrap up, my WHM got to 47. Still liking it, just don't have tons of time to play it right now. Once I cap my SAM merits and maybe replenish my of NIN I will spend some deliberate and extensive time working on it. Right now my goal is 51, Serket Ring and staves. Thats what I really want.

Tuesday, February 19, 2008

Give me substantial updates and useful information or give me death.

So, I hate these kind of updates. We get a picture and not much else. The early speculation is that these are somehow related to the Nyzul Isle "new relic" weapons. I think that is a good assumption at this point. I have no reason to doubt this is the case. I have to wonder though, how they are going to make these weapons as good as and as rare as and as unique as the Dynamis relics. I mean, as hard as it may be, the idea that Nyzul Isle weapons are as difficult to obtain as any part of the original relics is a joke. I could join in a Nyzul Isle static today and have one on universally faster scale than I could from Dynamis. Sure, there is a difference in practice in how you get them, and more importantly, the Nyzul Isle weapons are likely to be only the very first stage in the process for making these new relics, but it just seems weird to me. Not to mention the fact that I have to wonder about a game that does very little obsolescence in gear trying to make the most difficult items in the game to acquire obsolete. Anyway, here are some pictures of those "new" items. Not really even new, as some of them aren't even reskins, but I am willing to give SE the benefit of the doubt.
Probably nothing of interest update wise until tomorrow, and since I promised to go over MNK and SAM lets do that now.

My MNK is done for all intents and purposes. Done is an interesting word, lets more say that I have hit a gear roadblock for now, at least until I start finishing some Usukane. I can get HQ's of things, and I can get lateral replacements but for now I am quite pleased with my MNK.
For Merits:
Destroyers
Tiphia Sting
Walahra Turban
Peacock Charm
Merman's Earring
Brutal Earring
Shura Togi
Melee Gloves
Sniper's Ring
Ulthalam's Ring
Charger Mantle
Black Belt
Byakko's Haidate
Dune Boots

For Asuran Fists:
Destroyers
Tiphia Sting
Optical Hat
Peacock Charm
Merman's Earring
Coral Earring
Shura Togi
Ochiudo's Kote
Sniper's Ring
Ulthalam's Ring
Charger Mantle
Life Belt
Shura Haidate
Rasetsu Sune-ate

Only the Rasetsu Sune-ate stand out to me as something I do not like. But there is little for MNK WS, and it was this or spend 20k AP on the Pahluwan Crackows for +5 Accuracy. Now, I would normally be OK with 5 accuracy over 5 attack, but I have two reason to avoid it for now. First, that 20k AP can be spent on Yigit gear for my WHM should it eventually reach that level and second, I am hopeful that those fucking bees will eventually drop my fucking 35 feet.

Wow, have a lot of work to do today, so I kind of let this fall by the way side. Tomorrow will be more carefree and I will continue on babbling about MNK and then continue to explain why my SAM is gimp. :)

Monday, February 18, 2008

Reeks of desperation.

Ok, come on, this is just pathetic. Have the RMT really gotten this desperate? I mean they aren't even trying anymore. Back in the day, the RMT operations were intricate, well crafted and even innovative. Today, they can't even get the game right. I mean, come on, Gold? Realms? Come on guys, lets put some effort into this, at least get the freaking game right...

Anyway, lets see, what to go over today. Well, I guess the first thing is that Absolute Virtue still isn't dead. And if it wasn't killed this weekend then that likely means that it isn't going to be killed. Here's the problem. The video SE released didn't make a bit of difference in the key places that have to be fixed in order to defeat AV. Manafont Meteor can not be dealt with at any time. It is a one-hit kill of an alliance, and unless a definite, repeatable way to prevent it from happening is discovered, AV is unbeatable. Repeatable Benediction is another definitive killer, and we haven't even gotten that far yet. This AV video could have every clue we could ever need to beat AV, but it is like discovering an Egyptian burial hall before the discovering the Rosetta Stone. We know there is information there, and we know that it is important, but we have no way to interpret it. We have no context for what we need to be doing, for how we need to be approaching this and most importantly for how we should use this information. We don't need more hieroglyphics, we need some kind of way to translate this information from what we see into something we can understand and use. We can sit and try to discover this bit by bit, but we will be here forever without some kind of context. The next person to interview SE, be it NA, JP or EU, has a responsibility to ask them directly how we are supposed to use this information and how it is supposed to help us. Even if it ruins their reputation and relationship with SE, they must not let this pass any longer. We need direct answers, because at this point, Absolute Virtue even more of a mystery than it was before, and at some point SE is being irresponsible and inconsiderate to its player base. If they want to have us figure it out, that is fine, but we need fucking context, not hints and clues that mean nothing without it.

Am I as frustrated as everyone else? Definitely, and I am SE's number one apologist. This is just fucking ridiculous. Someone needs to break into SE's offices and look at the mob coding for AV.

In other news, some interesting happenings in Salvage as always. First things first, Saturday morning we did a SSR run with LAC as our goal. And it finally dropped something we needed: The Bodb's cuffs went to Crlmsonking after Eternalpain passed them to her. She went right out and got her stack of Bloodwood Lumber and handed them in, so the very next morning she had a brand to pair of Morrigan's Cuffs. We still have a ton of people that can use both the Bodb's Cuffs and Ea's Brais from LAC. On Sunday night we did a Bhaflau farming run. Mad Bomber was up, so we were able to do the first, second and third floor Ramparts, and shockingly enough we didn't see one god damned NM for the entire run. The bees now haunt my dreams. How I lust for my Usukane Sune-ate... well, at least we have 4 completed pieces now, and I think things might improve a little more because I have been invited to do some runs with Blaize and Espera's group, and they are probably one of the best Salvage LS's on the server. I am going to do two runs a week with them I believe. Probably on Saturday and Tuesday night, so that means either reworking the Tuesday night run that I currently do with Versus or removing it from the schedule altogether. I am leaning toward the later because I think it will help everyone conserve on their Assault points, and it will let me learn from the other group on how I can make our runs better. Let me say this, while I think our Salvage group is pretty darn good at this point, we still have a lot to learn. There are three things that we could really learn from Blaize and Espera's group. First, lotting on cells and knowing who is more important and less important for gear without being told what to lot. Second, knowing what to do and where to go in each zone. We have been doing many of these zones over and over and we are still having problems with people just standing around waiting for instructions or going the wrong way. Third, taking instructions on the fly. There are times when a lot of time can be saved by splitting the group to do two things at once, but being able to pick up on-the-fly instruction is key to this. That being said, our group does have a very good perspective on some aspects that the other group does not do. We do a lot more MNK pulling and Counterstance tanking on multiple mobs on the the first and second floors where Counterstance is devastating to the mobs. Not only does this focus damage in one place, but it puts damage and hate on mobs that are still yellow to protect the mages. Sleeping multiple mobs runs risks, especially in a situation with low HP, MP and few that can use magic. It's all a learning experience, and I am willing to learn.

All that being said, my experience with the other group was fun and exciting. They move very quickly, and I was a bit afraid about not passing fast enough (a couple of times I was a bit slow but it wasn't that bad) and since I was the new guy I got to lot last on cells which was fine by me. I didn't get a legs cell at all, and since none dropped during the Bhaflau run we did last night, that made two full runs without pants (it's chilly in the Remnants LOL)! Anyway, they do kill faster than we do in general, for two reasons I think. They just run into rooms and kill everything fast with no hesitation and they engage mobs first then pop cells. Their goal for the run was to do the NMs on the first floor, both on the second floor, the third floor one that drops cells, the sixth floor which pops after killing 4 previous NMs (or in the case of Jakko popping it) and then the Boss, Battleclad Chariot. All went pretty well, and they adapted an idea I heard previously for popping the NM on the first floor. They cleared a wing, leaving only one person who hasn't used any cells, as soon as the Don Poroggo is dead, everyone but that one person with no cells logs out, counts to ten, then logs back in. This will pop the Poroggo Madame on the first floor without having to waste time without cells. The first floor Madame got a couple of Frog Choruses off (I hadn't set my filters correctly so I missed it when it used it on someone else in the other party) but we dealt with it and moved on. The second floor was cleared very quickly, and the parties were split to deal with the NM and spawn Jakko to be able to zone up fast. The third floor was just a kill fest, and the fourth and fifth floors were basically skipped. On the sixth floor, I got off a Shoulder Tackle to stun the only Frog Chorus the Madame tried to use so at least I felt useful for that. LOL We then cleared the floor, and I definitely learned how to pull this floor effectively. Essentially, there is a Chariot that when engaged will spawn a bunch of other Archaic Gear and Gears. They pulled the Chariot into one of the side rooms, then split four people off to deal with the Chariot and the other 6 people killed the two Gears that link to it and then pull the rest of the room. Very fast and effective. The boss fight was actually a bit anti-climatic in that I just got to stand there absorbing damage. LOL It was down pretty quickly, and with effective positioning, Shell 5, as much HP gear as I had on me, and a Chakra, I didn't even have to pull back until it was dead. It was fun, and I am happy to go again and learn more. :)

Ok, enough about Salvage. LOL Lets talk about my jobs for a minute, because I just wasted a ton of Ancient Beastcoins on a Charger Mantle and I'm proud.
Now, you could say this was a huge waste of gil, because I could have sold the coins, but I share my coins in Omoi and we don't sell them. At least not yet, maybe after I finally get my NIN AF+1 hands we will start selling them to help fund Omoi's Gungnir. Anyway, the point is that I have it for my MNK now which is pretty cool, and moves me one step closer to my perfect MNK build. My MNK was basically built for Salvage as is, with Penance and Invigorate capped as I believe those are the best for Salvage. Now, I will not use the Charger Mantle for Salvage, because I use my Cerberus Mantle there for the enmity along with Olibanum Sachet instead of Tiphia Sting just because the HP loss just isn't worth the gain to me. Now that my MNK is done merit-wise, I have been finishing up SAM and I will soon be done with that too. I am at 4 saved merit points, needing one more for Meditate level 5. Then its just nine more until I have everything I need for SAM.

It's time to go home, so the quick wrap up.

Don't think too many head up the Range anymore if this is up: No drop. Saw this in Campaign: I have no idea why there is a Cactaur running around allied with the Windurst side. Potpressure got Scholar to 75 in a party with me. He is the first person I know personally that has Scholar to 75. Congrats! ^.^/ Finally, I think this pic was pretty cool looking, besides the fact that everyone is in a cool battle stance, the Aern is miscolored from Potty's Noctohelix and it caused this sweet Negative Aern look. More on completing SAM and MNK tomorrow.

Friday, February 15, 2008

What exactly did I miss?

I was sick at home the day the world was supposed to end. Well, it didn't and in case you some how missed it SE finally released the video with hints on how to beat AV. What did we learn? Well, pretty much nothing. Two very basic hints can be surmised from the video.

1) There is something about nuking AV with the element of the day.

2) There is something about using two hours when AV two hours.

So far, thats pretty much it. What little test has been done appears to have been done by people that had little to no idea what their plan was going to be, maybe assuming that since the video was released it made AV somehow less difficult. Their first attempt included neither of the basic hints listed above, and just mainly included fighting as normal, eating Meteor and dying. They made other attempts, but I am not really inclined to pass judgment yet until I see some of the big time LS's give it a try. I know that LB is going to give it an extended try soon. In general, I consider most of the people in LB to be intelligent and dedicated (perhaps maybe a little too dedicated, at least back in the day) players, so any attempt that they make will likely be well thought out and made with the intent to find the exact triggers to lock AV. My general impression is that LB really doesn't have the intention of hiding the information if they do discover anything new, but even if they did half the server is going to be there watching them do it, so it's not really going to matter either way. :)

So, yeah, I missed talking about that when it was released, but it ended up not really meaning anything anyway, because nothing new has happened. I don't know what these videos were supposed to show besides what I have noted above. There is rampant speculation, but this speculation usually just sucks. I think that there are probably three clues we are supposed to be getting because there are three separate sections of the video, but I can't really tell what they did differently from the second and third video. Oh well, I will let my betters give it a try. I know they will have much better input that most of the ideas I have seen so far.

In addition to the AV video there was also the announcement of the mission story lines. More good news for us, and I don't mean because of the info in this update post. If they follow the pattern so far then we have like 4 more update posts if the update is the first Tuesday of March. Those are really huge if's there, though. One of those will almost definitely be an equipment update, because there has to be some new equipment end-gamish equipment released or I think some people's head my explode because apparently content=equipment. There will also probably be a job adjustment announcement, with WAR, MNK, RDM and others supposed to get adjustments. Honestly, to me, all of the adjustments so far sound pretty lame. WAR gets Counter? Thats called MNK. MNK gets more and better kick attacks? My fists do fine as is. RDM getting to melee more? This one has the most potential, but it also has the most potential to be totally and completely lame. SE seems to forget, that they made it so that we are very gear dependent, and that staves are a big if not huge part of that. I am definitely leaning toward the "completely lame" side on that one. Anyway, even with those and the idea that we will get at least four more info updates, there are two that aren't accounted for as of yet. Yes, kids, its time for more rampant speculation. Here we go!

Lets start with in game voids that currently exist. The one that is most glaring to me is Fort Karugo-Narugo, it unlike the other truly new areas in the expansion, does have an area with no mobs (well Campaign mobs attack the area but if you are not in Campaign they will ignore you). In this area there are a plethora of smaller rooms in the Fort area proper, and within these rooms there are numerous inactive telepads. These have got to be for something. Considering the relative ease there is to reach this area from the Campaign teleport point, I am going to concluded that these have to be used for some kind of event. I know, way to go out on a limb there Ring, but hey, what do you want from me? There really aren't any areas in the .dats that these could connect to, but what is to say they won't include new maps in the update. Just because they have never done it before doesn't mean it will never happen (yeah, I don't even believe that either, but man, they have to be for something, right? RIGHT? *sobs*). Area 2 with potential are the three Assault like areas: Everbloom Hollow, Ghoyu's Reverie, and Ruhotz Silvermines. Until I just checked right now, I thought that these three corresponded with the three starter zone fronts, but Ruhotz Silvermines is actually in the Derfland Front region. Then again Fort Karugo-Narugo is part of the Sarutabaruta Front so who knows. Anyway, another adventure way out on the limb is that these areas that like and a generally formated like Assault maps will be used for, get ready for this, an event like Assault. I will buy a bridge in Brooklyn or beach front property in Arizona before I believe that they are only going to be used for the oh so difficult Campaign Ops that they have currently tossed in there. As for beach front property in Arizona, one can only hope that one day we will all be able to swim in a cool Arizona bay.

Now, in the eight minutes I have left before I make a mad dash for the front door of my building and flee my place of work, I want to answer the question you are going to ask before you can even ask it. Yes, I do know about the beastman strongholds, and yes, I did intentionally exclude them. Why do you ask? Well, simply because I think they are going to be open zones, there may be some event insides, but they are not a void that needs to be filled. They are not Ou'Hpat Obelisk or Lower Promyvion here people, they are zones we know and love, and they will be about the same, except with the Campaign twist. There may be events inside of them, but the structure isn't going to change.

Thats it, hopefully someone will figure out AV this weekend. And even more hopefully it will be LB, then I change bug Banderdragon for hours on end about how to beat it. :)

Tuesday, February 12, 2008

The good news.

Ok, so SE has given us two updates on regular intervals since the released the info about the patch that is coming. This is good, and I will explain why right after I post the info about the update:


Dancer and Scholar Quests: The Journey Continues (02/12/2008)

Exciting new quests for both dancer and scholar jobs have been scheduled for the next version update. Through these action-packed quests, you will be able to learn more than ever before about the Vana'diel of the past, as well as get your hands on new artifacts and even break higher limits!

What fate awaits our courageous adventurers? The following is just a taste of what you can expect in the next version update:

Dancer

Learn about the establishment of Troupe Brilioth as well as the shrouded past of its charismatic founder and leader, Laila.
Who was the mysterious piper by the lake?
And what is the significance of the seemingly innocuous glowing pebble?
All will be revealed as the wheel of fate sets the stage for the final dance-off...

Scholar

The grimoire--a tome of tactics and strategies in magic, penned by Schultz II... What secrets are concealed within this artifact of immeasurable value? Bear witness to the rise and fall of the Schultz School of Martial Theory during the Crystal War, and discover the truth lost within the dark passage of time.
Brace yourself for the shocking finale!

*Certain job level requirements must be met in order to undertake the above quests.

The reason why this is good is because, unless SE is going to keep us in the dark for the next two to three weeks, we are looking at getting a bunch of version update information. The version update teaser was released last Tuesday, on Thursday we got the Campaign info and today we got the AF and Limit Break quest update. If they didn't have a lot to offer in this update I highly doubt they would have given us the main thrust of the update information in the first two update notes. This goes to support my hypothesis that this update will probably be giving us a lot of the stuff that SE wanted to include in the original expansion but did not have time to include because of the specific release date. There will still definitely be at least a mission info update and probably at least a gear update and a job adjustment update. But even with those predictable updates, I think there is more coming. My guess is there will be some semi-endgame addition, in the vein of Assault, but not necessarily the same function. I doubt we will be getting something like Salvage yet, but there will be something with endgame style rewards but nothing too earth shattering. My guess is they will use the Assault-style zones that are currently used for the incredibly light Campaign Ops missions. It just seems to me that there is no way that SE intended these zones to be for such a limited use. Probably an obvious statement there, but sometimes you have to explain that to the people that think that SE is run by a bunch of monkeys, and yet love playing their game. Finally, I wouldn't be surprised if we get at least one info update that no one expects. SE has been playing their cards pretty close to their chest on this expansion. I think there is concern at SE that they over-promised with ToAU and they don't want to do that again. I think this is why the Fan Festival this year didn't cover anything close to what the last one covered. I don't think they are as worried about delivering things late (i.e. the timeline too longer to release than they promised) so much as failure to delivery things at all, like the Coliseum. That is probably a JP based fear more than an NA derived one as the NA's tend to complain about things that are in the game rather than worrying as much about things that they have promised to come. Don't get me wrong, you will still get NA's wondering where exactly the Coliseum went, but in our culture, and especially in our software development culture, delays, empty promises and vaporware is the norm not the exception. Promise the sun and deliver the moon, I guess. But anyway, I digress. One more thought on this then I will move on, I think it is time for SE to delivery on a real raid like instance. Now, you might think that they already have something like that, but the closest thing that they have is Salvage. Now, I love Salvage, but I think you can take the zones like in Salvage, actually start people off with the gear that they have earned and create something similar but with different branching goals. Some groups may be able to kill all the NM's in a Salvage zone and the boss but for most of us, we have to pick and choose. I don't think this is a bad concept at all. Create a zone with branching paths, at the end of each path is a reward or part of a reward for something from the zone. It could be as close or far from Salvage as SE pleases, in that there can be multiple zones which have items that are combined to form the new gear, or they gear could be gained directly from the zone. Either way, the idea of an intermediate reward must be implemented. I think this is something that is missing from Salvage, and Salvage could definitely benefit from a system like in Nyzul Isle where you could use points to purchase items to boost yourself for the boss instead of relying on the randomness of drops and chests. A branching paths instance could be as small or large as needed, and would have high replay value because choosing one path would lock out the other paths for the run. Meaning that a group would have to be constantly repeating runs to get the gear they want, or to achieve goals they need. I think that some combination of a Limbus or much more limited Einherjar system could also be good to ensure high replay value also. Minimum of 6 and maximum of 18 and I would make the difficulty higher so that the more you included the better off you are, instead of a Salvage system were more people is actually bad because of cell distribution, but I would also make it so that even a low number could do at least some portion of the event. Keep it a timed instance so that people can know what to expect and how long they are going to be occupied with the event. Finally, toss in some mysteries, not "how do you lock AV" mysteries, but "how do you spawn the Madame" style mysteries.

That was long and rambling, but I do think it is a good idea, and hopefully we might get something like that soon.

By the way, if the Sandworm ever drops anything decent, it might actually be a good idea for an HNM. Spawning in one of six zones is a good idea, it would be even better if it had a wildly open spawn timer too. Sure, all the bad people would just plant a mule in each zone with the hax to detect when a mob spawns, but at least if people were quick and lucky anyone could get out there to claim it.

On with the show. Limbus last night, the run was kind of ugly but we got two wins and I finally got a Plaited Cord! Now, I am either going to get the Ninja Chainmail +1 which is nice I guess but I am a bit hesitant on it because with Koga Chainmail or Haubergeon +1 it just doesn't seem to appeal as much as Ninja Tekko +1 which will finally give me some good WS hands for my Ninja. My poor, poor Ninja, not only did I delevel it last week for the first time ever after a low man Hope went bad and I had to sac it while everyone recovered, but I also am deleveling my Katana merits. My first Combat merits ever. :( Well, they are going to a good cause, my SAM! :) I am now just 2 levels away from capped Great Katana and with a new Divine Might coming in a couple of weeks I will have a brand new shiny Bushinomimi. :) I am also going to finally get my last two WS gorgets made for my SAM, just need about 13 more Phuabo organs and I am set. And maybe, just maybe if we can get a Skirmish Pephredo to drop some feet I will be able to massively upgrade my SAM. The +7 Store TP on the Usukane Sune-ate would free me up to use the Peacock Charm (until I got a Justice Torque) and would add +2% Haste to the 17% that I already have. They would also be amazing for my MNK, more Accuracy, Attack, Haste (netting me 24%), and that Store TP would even help because I keep getting to 99 TP in my current set up.

After Limbus we had Assault, and I decided to try to get a win on a Rank 10 mission. I really love doing Rank 10 missions but it can be troublesome at times because there are a lot of people that need them finished but not enough to do 2 runs so people get excluded, and I just hate excluding people. But at some point I have to pick and choose who gets to go because we do need to get them done. I am going to get everyone through them, but these Assaults are much more difficult than the other ones so you need optimal set-ups to ensure that they have a chance at success. Last night's adventure was Bellerophon's Bliss. The first run didn't go so well. We regrouped afterward and reshuffled the party line up a little and gave it another go. NIN, SAM, DRG, RDM, WHM, BRD. With this set up things went much more smoothly, still at 20% it used a nasty Fulmination, but we survived for a little while until it did another one which took me down. So Glacian and Hellz tanked it while I got up and out of the way until it dropped another Fulmination and killed Glacian and Hellz, so I had to come in weakened and tank it. With long shadow recast timers, Omoi, Skur and Achi just over cured me to keep me alive until it was at one percent when Hellz and Glacian just came in and finished it. I died right before it did because someone tried to kill it at 1% with a Holy. LOL ^.^ Anyway, a win we had, and that puts me at 2/5 for Rank 10 missions, and I have heard this is the hardest one to beat. I think that it would be easier if people used teams to fight it. For example, have two NIN, two healers, a BRD and maybe another DD like a SAM. Fight it until 40%, then pull one of the NINs and one of the healers off of it and out of range of Fulmination, once the Fulmination lands have the other NIN head in and tank it with the other healer. Pull the other team out of range and let them either raise or recover, then rotate like that until it is dead.

Did I mentioned that I miss Iz? Well, I do, and since I was leveling Scholar as a subjob with him and Omoi, that is now on hold. So back to leveling BLM again, the job I loath, thanks Iz! LOL Anyway, Omoi and I duoed on SMN and BLM and that was really effective. Man, I can SO easily level BLM now that I have Thunder. Worms just cry, hehehe, and if I am MP efficient and don't get resisted, I can usually kill two Worms without having to rest. This may not come as a shock to 99% of you, but man, do I have BLM, so I don't know shit about it outside of endgame. Omoi was able to do some great damage on SMN with Fenrir on the worms and I got to 22 on BLM before heading to bed.

To wrap up, I hope you find this as disturbing as I did.
Oh, and here is another sweet Elfie video that he made of his parties epic Alexander mission fight. Iz is tanking, of course. He tanks everything.
See you tomorrow.