
So, I haven't done an in-game update in a while, and although I have been diligently working on the next On the Cheap series it is definitely time for an update. So, Salvage is being Salvage, really. We got two back-to-back Marduk Body 35 pieces, and a win in Zhayolm (a bad pull on my part on the 6th floor killed the other Zhayolm win) but the Zhayolm win only gave us double Skadi Hands. >.< Still no 25 piece from Zhayolm but honestly, that is just a matter of time. They great thing about Salvage lately is that we are getting better and better, and even though we do fuck up from time to time (like last night getting HP aggro in Hammerblow's room and wiping) we are getting very fast at most of the zones. The two Marduk bodies went to Crlm and Omoi, and now Omoi has another 12 Imperial Wootz Ingots to come up with on top of the 5 she still needs for Ares Body. The real question is whether Omoi will get the second set of ingots done before or after her BRD hits 75. Hehehe.
In other news, Versus did their first Einherjar in a long while and it went very well and we almost got the win. LOL We had 18 or so bones, and the Manticore boss. When we had killed about 14 bones, the boss was accidentally aggroed and we had to deal with that while there were a few bones floating around. So we just shifted over to the boss and killed it, then finished off the last of the bones, then we hunted for the chest and it spawned, we opened it and we got zoned out. >.< No feather for us on our first run, but we did get the materials and they dropped to Potpressure and got randomed off and we got our full clear 960 ampoules for killing all of the mobs. LOL Well, there was a lot more excitement about Einherjar coming out of the event than going into it.
There were a couple other things that happened recently, but without pictures I don't recall all of them, and I am going to get back to working on the Ninja guide. :) See you tomorrow.
Monday, June 30, 2008
It's been a long time.
Wednesday, June 25, 2008
On the Cheap #2: Samurai.
So, now that the On the Cheap's first installment is complete I am going to move on quickly to my other main job, which is Samurai. Now, I like Samurai but it is not as straight forward as Monk is for deciding what to use and what gear is an isn't that cheap and easy to get. I am going to use a wider range of gear here, but remember in the end, this is a guide for people just reaching end-game on these jobs. It is not intend to be an ultimate guide on how to play Samurai, it is a guide on how to be a good Samurai in the quickest and more efficient way possible.
In all my On the Cheap guides I will include the basic rules that you have to accept before this guide can be of any use.
1. You can't be dumb. Sorry, if you are dumb, I can't help you. If you are the kind of person that hears something and then sticks to it no matter what, just quit now. If you can't adapt to changes in the game, quit. If you refuse to do something because you don't think that should be the play style of the game, then just fucking die in a fire. Flexibility is key, the more we learn about things in the game, the more we improve the play style and the more things change.
2. You have to really be an end-game player. I am not expecting you to have every title in the game, and have done ever mission everywhere, but I do expect you to have done main story-line content. This should be a goal of an end-game player at the very least. Zilart should be finished up to at very least Sky, CoP should be finished up until the end, and Aht Urhgan up until the end. If you don't have these, or at least most of it and trying to get to the end, then you aren't an end-game player, you are just lazy or your are just making pretend.
3. You have to be able to do some end-game events. I am not demanding that you be in a full-time HNM LS or anything, but you should have access to a LS that does at least some of those end-game areas/events. If you don't then you really aren't an end-game player, you are just a player with a job at 75.
4. You have to be willing to spend at least a little bit of gil. Sure, this series is called "On the Cheap" but it is not called "On the Gimp" so you will need to spend some gil getting some of the gear that you need. I am not going to tell you to get all HQ gear unless it is cheap, and I will also indicate expensive items that you will need anyway, or cheap items that are good replacements. This is like the Frugal Gourmet for FFXI. Yes, I know, none of you got that reference. :(
So, basically, don't be stupid and try your hardest.
Oh, a very, very important precondition for this guide. This guide is based on the idea that you already have 5 Store TP merits so that you can get to a 6-hit build. You need and must have 5 Store TP merits on SAM. Once you hit 75 on SAM, you should only merit Store TP until it is complete, then you can go on to other things. A 6-hit build on SAM is critical to everything it does and should be the immediate goal of any 75 SAM. There are three basic set-ups that you can use for this (1) Askar Korazin, Chivalrous Chain and Brutal Earring, (2) Hachiman Sune-ate, Chivalrous Chain and Brutal Earring, and (3) Hachiman Kote. I will go into more detail, but these are the basic choices you have to maintain a 6-hit set-up. Alternatively, the Ecphoria Ring can take the place of the Chivalrous Chain depending on the quality of your neck piece. The goal is to try to get to at least +7 Store TP from the optional gear during TP phase so that you don't need any of it for your WS build. There is also a fourth option which removes the Chivalrous Chain (or Ecphoria Ring) from the first two scenarios but requires using Hachiman Sune-ate during WS's to make sure you get enough TP on the WS to complete the 6-hit build. Honestly, no matter which way you go you will do fine, but do what is best for you.
Weapon. Alright, on the very first slot I am already throwing the "On the Cheap" heading right out the window and I am telling you to buy an incredibly expensive piece of equipment, the Hagun. Now, this is one of those places where you can see the difference between being cheap and being frugal. If this really were a guide to just doing things the cheapest then you would avoid a Hagun at all costs, but this is a guide designed to help people find the best way to get to an acceptable level of gear as fast as possible. The problem with the Great Katana selection is that there just isn't anything close to how good the Hagun is in terms for straight damage output. Save, borrow, whore yourself out to Shantoto if you have to, but make sure you get one. If you need a Great Katana in the mean time, there are several decent selections. The Onimaru is a decent pick, with some nice added bonuses, as is the Shinsoku because of the additional STR. Also, the Ushikirimaru is a good pick, high base damage and some additional STR too. In the end though, any alternative is just filling a pretty wide gap until you get a Hagun and thats it.
Grip. Grips have in general gotten to be pretty cheap, so I don't really see a reason why anyone shouldn't be looking to pick up a Pole Grip. It can proc even if you don't sub a job with double attack and it can proc on WS. I suppose you can use the Axe Grip as an alternative because of the additional STR, but I doubt that the bonus STR will out damage the occasional bonus swing on a WS. I would avoid the Claymore Grip, because it appears that WS's can not crit unless they are forced to crit like with SA or Might Strikes or they are a crit-hit WS, and since none of the good SAM WS's are crit-hit ones, it's best to just avoid it.
Ammo. At least this spot is easy to deal with, it's either Tiphia Sting or Smart Grenade again, just like with Monk. Again, I use the Tiphia Sting because I prefer Accuracy in an equal trade off with Attack, but the both don't do much and they both are pretty close, so the choice is up to you.
Head. The default, simple and plain, is the Walahra Turban. That much haste can't really be beaten, except for a few cases. One of those cases is the Askar Zucchetto which is comparatively easier to get than the other option, but just because you can control the situation for which it will drop. The Askar Zucchetto comes from Floor 100 of Nyzul Isle, so with a small skilled group and a little bit of persistence this is an achievable goal. Now, I have derided most of the gear from Nyzul Isle in the past but this is one of the exceptions. 4% Haste, and an additional 4 STR, DEX and VIT makes it a pretty good option. Nyzul Isle takes some skill and more importantly a good combination of jobs, but it should be achievable for anyone that puts their mind to it. For me, the trade off of tags for Salvage makes getting one of relatively low priority for now, but I do get in an occasional Nyzul run to help out friends so I might get one eventually, and when I do I will give more information on its quality.
Neck. Ok, things get a little bit tricky here because this is one of the slots that you might be using to get to a 6-hit build and you may or may not need the Store TP from the Chivalrous Chain. If you are going with set-up one or two that I listed above then Chivalrous Chain is the way to go, but if you are going with set-up number three then as with Monk, I think the neck slot is a good place to pick up some accuracy so the Spectacles are the way to go with set-up number three. I would avoid using the Chivalrous Chain if you already have your requisite 7 additional Store TP, because the Accuracy is going to help you more than the STR.
Earrings. Ok, the most fundamental earring that you need for Samurai is a Brutal Earring. The Brutal Earring not only has Double Attack on it but it is also a key component to the first two Store TP build options. Yes, again, I am assuming that you have Sea and that you do Limbus at least somewhat, but like I stated in the introduction is that I believe that is a minimum that you should have to be able to use this guide to it's fullest. If you don't have Sea, then get it, and stop complaining that no one ever helps you, because people are out there that will help you if you just ask and hey, why don't you get off your ass and try to arrange it yourself. Anyway, after a Brutal Earring is the other easy choice for any Samurai, the Bushinomimi. Divine Might is very simple now if you have an even semi-competent LS to help you out with it. I do understand that people may not have a Bushinomimi because they have another earring that can better utilize another earring, so as an alternative, the Coral Earring and Merman's Earrings are decent options to fill the gap. You could also use a Fowling Earring but in general I would steer clear of it, because the Accuracy is nice but the STR is next to nothing in general, and I just don't see the cost justifying it's purchase over the attack earrings.
Body. My main suggestion is a Haubergeon the balance of Accuracy and Attack, DEX and STR just can't be beaten. I have to say that I do not have an Askar Korazin so I am hesitant to say that the Haubergeon is the best with out testing (and I don't need it anyway with the gear that I have), but the logic behind using the Askar body is that it has Double Attack and lets you use more haste, the knock against it is that it is a big hit in accuracy. The problem I have with this piece is the same problem I have with many end-game people that want to listen to the top-geared people without thinking about how it affects them and their our equipment builds. The bottom line is that if you can use the Askar Korazin without having accuracy problems then you are freeing up another slot that can be used for haste, but think of it this way, the reason that you use a 6-hit build is because it is the equivalent of having an additional 15% haste in getting to the next WS, but if you miss one time in your TP phase just so that you can have 3% more haste you will actually have -12% haste in getting to that next WS. So, use the Askar Korazin if you have the accuracy to justify using it, but don't kid yourself if you think there is a question, get the Haubergeon and be happy when you outparse those that haven't figured out that you need to be able to hit the mob to be able to get off the next WS. Another alternative that you could use is the Byrnie which has a huge amount of attack on it, but no accuracy and not much else to justify it's use, again, it is another situation where if you have enough accuracy to justify using it then it is great, but until that time I just don't know if it is worth it. Outside of those options, the only thing that I can tell you is that there are a bunch of things you shouldn't be TPing in like Kirin's Osode, Hachiman body, and just about anything else that you could come across.
Hands. This is another slot that is effected by the Store TP build that you choose, if you choose to go with Store TP in the hands then Hachiman Kote are the way to go. They give enough Store TP by themselves that you don't need any of the other optional pieces like the Chivalrous Chain, but they do require giving up what I believe to be the slightly better option, Dusk Gloves. Dusk Gloves have a bit of Attack on them and a bit of HP too, while the Hachiman Kote set up still has the haste in the feet slot but not the Attack or the HP. The comparison is close and it's a very close call either way. To me, this is an either or situation, so their really aren't any alternatives to go into here.
Rings. There is a requirement for Samurai here and it may cause consternation for some people because it requires changing a CoP ring, but you really must have a Rajas Ring to make Samurai work in end-game. The simple reason is that all of the 6-hit build options that I have listed above include the requisite 5 Store TP from the Rajas Ring. This added to the fact that it also adds 3 or 4 Accuracy and Attack in addition to the 5 DEX and 5 STR makes it a completely required piece for Samurai. The other optimal ring for Samurai is Ulthalam's Ring just because the stats are so good in it in general and that it is amazing in Salvage. Other options include the Blood Ring, Sniper's Ring and Woodsman Ring. Alternatively, you can use the Ecphoria Ring, which is in general below my accuracy threshold for a ring slot but if it allows you to free up the neck slot for something better then it may be a good option.
Back. This slot is pretty easy, just go with an Amemet Mantle +1. There are better options but cost/benefit ratio of them puts them well outside the scope of this guide.
Waist. The Swift Belt is the best reasonable option for this slot, the haste is great, and it even has a little but of accuracy. Sure, there is a hit to attack on it, but the haste, especially when it is stacked with more and more haste, will far outstrip anything you lose from the reduction in attack. The NM for the Swift Belt isn't all that difficult and the pop items can be farmed pretty easily. I have heard about some horrific drop rates but it can be done with just a few friends. In the mean time there are a couple of options that a Samurai can use, but most of them are pretty far off of the Swift Belt. They include: Swordbelt +1, Life Belt or even a Warwolf Belt could work.
Legs. Well, the stand out here, like it is for pretty much any job that can use them, are the Byakko's Haidate and if you are in pretty much any end-game LS or group you should be able to get them eventually. If you don't have them yet the Shura Haidate are a very good option. The Accuracy is great and the STR adds a little attack, too. Askar Dirs are another decent option, some Accuracy and some Attack is always good. All three of these options are items that usually takes some time to get, so lets look at some other options that could work: Myochin Haidate +1, Galliard Trousers. None of these are AH options, but there aren't very good AH options for SAM in the legs slot anyway.
Feet. The final Store TP slot that needs to be considered. Now, if you had already chosen to go with the Hachiman Kote option then the best option here is the Fuma Sune-ate for the haste, and followed closely by the Fuma Kyahan or the Sarutobi Kyahan. If you are going with other options then you will need a pair of Hachiman Sune-ate. Those are the two good, cheap options for you, and that wraps up the TP build for SAM.
Ok, now that we have that out of the way the WS gear for Samurai is actually much easier to go through than the TP gear because you don't have to worry about Store TP anywhere near as much. A few words on Samurai WS's to start. Unless there are some hidden stats to the Samruai WS, which has been suggested but never proven, all three of Yukikaze, Gekko and Kasha have the same 75% STR mod and should, in theory, do the same exact damage. This is a huge STR mod and makes a lot of the choices for gear much more simple. Also they all have massive increases in damage as TP increases, and this is the reason, even with a much lower base damage than many other end-game Great Katanas, that Hagun shines. Also, it should be noted that there is some evidence that single-hit WS's get a rather large boost to Accuracy and I have made some of the gear choice options with this assumption in mind. Ok, on to the gear.
Head. Ok, two basic options here. The cheaper and readily available Wyvern Helm which is great for the STR, and the much more expensive but still not that difficult to get Shura Zunari Kabuto. The Shura Kabuto is obviously better because of the Accuracy and equal STR. Another potential option if you have it already is the Askar Zucchetto. A little bit less STR for a little bit more Accuracy, but overall I would still favor the Wyvern Helm over it.
Neck. This is going to take some time, but go out and farm your Sea organs because the WS Gorgets are amazing for Samurai. You will need a Flame Gorget for Kasha, a Snow Gorget for Gekko, and a Breeze Gorget for Yukikaze. If you haven't gotten the gorgets yet, go get them! And in the mean time you can use a Chivalrous Chain or other STR neck pieces, but they will all pale compared to the Sea gorgets.
Earrings. The same answer here for WS as for TP, go with the Brutal Earring and the Bushinomimi. The Brutal is great because a double attack on a Samurai WS can do 500 damage or more, and you might need it for the Store TP on the WS attack to make sure that you make it too 100 TP in 6 hits, depending on the 6-hit build that you choose. If you do not have a Bushinomimi because you have another DM earring or just haven't gotten one yet, there are several other good options the most expensive being a Triumph Earring, but other good options are Fowling Earring and Minuet Earring. I know the Triumph Earring has more STR but if it is just going to be a placeholder item until you get the Bushinomimi or Brutal Earring, then I would say that it would be acceptable to save the cost on it and go with one of the cheaper options in the mean time.
Body. I used to have a little bit of a personal dispute on this one and I still occasionally second guess myself, but in the end I am going to suggest Kirin's Osode based on the assumption that single hit WS's do get a bonus to accuracy. Now, the weird thing is that when this was discussed in was in the context of what hands to use, but that was with the Gigas pieces that actually had a reduction in DEX and thus Accuracy, while the Osode actually still has some Accuracy on it and a bunch more STR. The problem that I am having with the whole thing is that I do feel like the Osode is a decrease in Accuracy over Haubergeon but I have absolutely zero proof of that observation whatsoever. I am going to do some parsing with Omoi in the near future and I hope to have some comparative results. But for now, as I already mentioned the Haubergeon is a well balanced pick for WS's, a lot of Accuracy, STR and Attack all rolled into one. Another very good option is the Askar Korazin, although it lacks Accuracy in any form, it has good Attack and STR, with some double attack for more damage on WS, and also the Store TP which can help to free up more Store TP space during your TP phase depending on your 6-hit build choices. Finally, for those that are new to melee jobs and need something else, I would suggest a Hachiman Domaru. Shut up, Skur. This is actually quite a good WS piece for Samurai, good accuracy and STR, a little Store TP to help out with your TP phase gear and it's cheap as hell. I would still use a Haubergeon over it, because I already have a lot of STR in my WS build and the extra attack helps a lot, but if you don't have as much STR then this can be a good slot to make it up.
Hands. This is one slot that I tend to vary from the masses on, because I prefer to use Myochin Kote +1 over Gigas Bracelets. Even when I am making trade offs in gear I still hardly like to use negative stats, especially stats that may effect my ability to hit a WS. And this is where the people that make the claim that single-hit WS's have more accuracy confuse me, as they say that it is ok to use Alkyoneus's Bracelets but they still use Haubergeon over Kirin's Osode. That doesn't make much sense to me at all. If you want to use Gigas bracelets I would go with them much cheaper Pallas's Bracelets because I can't see a 2 STR increase and a loss in accuracy as justifying the huge jump in cost up to the Alkyoneus's Bracelets.
Rings. The obvious first choice is the Rajas Ring. Since I already said that this is pretty much required for Samurai you should know that you should already have it. The question then becomes what can you use for the second slot. A Flame Ring is at the upper limit for what I would pay for this slot. The +5 STR is very good, but I think that going with an alternative +4 STR ring like the Ruby Ring can fill the gap nicely until you can afford something more expensive but with more STR. There are other more expensive +4 STR rings but I can't see the slight benefits justifying the cost difference.
Back. As always, the Amemet Mantle +1 is the way to go. Samurai can better justify getting a more expensive back piece later on because of the huge modifier to their WS's but again the price gap is huge.
Legs. With great expense usually comes great reward, and that is definitely the case for the Shura Haidate. Lots of accuracy, and lots of STR make for an awesome WS piece for any Samurai, but again it is very expensive and can take a while to get even with a good end-game LS, so in the mean time you can upgrade to a pair of Myochin Haidate +1 which have equal STR, but lack the accuracy of the Shura. Also, the newly introduced Enkidu's Subligar could work also, with a little bit less in STR, but the DEX does give it a little bit of Accuracy over the Myochin Haidate +1. In a pinch, you could also use the Fourth Division Schoss which have equivalent STR to the Enkidu's Subligar but lack any other redeeming qualities.
Feet. This is the only slot where Store TP might be a concern because in general the feet slot isn't that strong for SAM WS's in general. This slot maxes out at +3 STR on the best items and since the Hachiman Sune-ate are only down 1 STR and even have a little bit of Accuracy on them, they are not a bad option if you are using a Store TP build that only uses 6 additional Store TP during the TP phase (for example not using a Chivalrous Chain or Ecphoria Ring). If you do opt for one of the other Store TP set-ups and don't need the extra Store TP during WS's then the best option is the Rutter Sabatons. Attack and STR are hard to come by in the feet and these Sabatons have them both, and it comes from a very easy NM in Movolpolos that can be beaten with a small group and have a good drop rate. If you don't have your Rutter Sabatons yet the you can use the very easy to get Fourth Division Schuhs or the Askar Gambieras which come from the first boss in Nyzul Isle. Both of these latter options have 3 STR but the lack of Attack does put them a step below the Rutters.
And there you have it, a relatively cheap guide to being a Samurai. Ok, so Samurai is going to take a bit more gil than some other jobs to make it respectable, but as long as you avoid doing things like TPing in a Hachiman Domaru, then you can still look fine while you are building yourself up to the place that you want to be in. A final note, SAM is capable of subbing several different jobs, from WAR to THF to NIN or even DRG, and each one may need a little tweaking in gear, but at the very least this guide will get you to the point where it wont matter what you sub, you will still be able to do your job effectively.
RE: Monk.
Got a few questions about yesterday's post, gonna cover them quickly.
MogKnight said...
Hmm, in looking at all of this and comparing it to all the gear I have on SAM... the only real things I need would be Destroyers and Black Belt. I was thinking about leveling MNK as well so maybe I'll focu son it next.
Though a few questions if you don't mind answering:
1. I have Usukane Legs and Feet myself. It is pretty clear cut that Feet would benefit me more than Dune Boots. However, what about Usukane Legs vs Haidate for TP?
2. What are your thoughts with MNK and full Usukane?
Ok, in response to the first question, I went over this exact situation a while ago in this post. But essentially my feeling is that if you are using Byakko's Haidate and Dune Boots, and shift over to Usukane Legs and feet you will be much better off for it. I don't think I would use the Usukane legs straight up against Byakko's Haidate, but the combo of Usukane legs and feet crushes Haidate and Dune Boots stat-wise.
In response to the second question, full Usukane is probably the best, but the new SAM/NIN/MNK body piece with 20 Accurary, 20 Attack and 5% Crit hits needs to be tested first to see the comparison.
And now, to work on the Samurai On the Cheap. :)
Ok, Samurai version of On the Cheap is a little less than half done, I hope to have it up by tomorrow. :)
Tuesday, June 24, 2008
On the Cheap #1: Monk.
So, where did I leave off? Well, I am going to put everything I have already posted together in this one post to make it easier to use, and so it will make this post look longer than it really is! :) Oh, and Bg, yes, you aren't an end-gamer! LOL Just kidding, Bg pointed out that he has not completed the ToAU and thus by my definition would not be an end-gamer, so ok, there are exceptions whatever, my point is that you can either be gimp and accept it or you can try to equip yourself well and have some knowledge of the game. Bg is very well equipped and has a comprehensive knowledge of the game, so I am not too worried about him at all. Anyway, on with this dog and pony show. Oh, by the way, I have linked all of the gear that I have listed to the FFXI wiki, I would link it to the BG wiki but their equipment data leaves much to be desired. (And don't tell me that I should add the information myself, because I already redid the entire Salvage section and even added some maps, so blow me.) One final thing, I do want to note that there are other things that I didn't include, like Sea Torques and stuff like that, I based this essentially on the ease of acquiring the items if you have to do end-game events to get them. Sky is easier than Sea by far, just in terms of drop rates, even though I will admit that some Sea torques are more plentiful than others. The point is that this is a guide to get you from where you are to a level where you should be. It's help, not e-peen preening. :)
I have updated a few slots so check them out again for any new stuff I might have added.
The recap:
Ok, this is going to be a series of posts that I am going to do to help people that are new to jobs at end-game. This comes from experience and opinion, but in the end, it is what I believe is the best, easiest and quickest way to get to a point where you can start tweaking your gear instead of trying to get major items that you really need. Before I go into today's subject, Monk, I am going to go over a few things that I believe are prerequisites for this discussion to be of any help at all.
1. You can't be dumb. Sorry, if you are dumb, I can't help you. If you are the kind of person that hears something and then sticks to it no matter what, just quit now. If you can't adapt to changes in the game, quit. If you refuse to do something because you don't think that should be the play style of the game, then just fucking die in a fire. Flexibility is key, the more we learn about things in the game, the more we improve the play style and the more things change.
2. You have to really be an end-game player. I am not expecting you to have every title in the game, and have done ever mission everywhere, but I do expect you to have done main story-line content. This should be a goal of an end-game player at the very least. Zilart should be finished up to at very least Sky, CoP should be finished up until the end, and Aht Urhgan up until the end. If you don't have these, or at least most of it and trying to get to the end, then you aren't an end-game player, you are just lazy or your are just making pretend.
3. You have to be able to do some end-game events. I am not demanding that you be in a full-time HNM LS or anything, but you should have access to a LS that does at least some of those end-game areas/events. If you don't then you really aren't an end-game player, you are just a player with a job at 75.
4. You have to be willing to spend at least a little bit of gil. Sure, this series is called "On the Cheap" but it is not called "On the Gimp" so you will need to spend some gil getting some of the gear that you need. I am not going to tell you to get all HQ gear unless it is cheap, and I will also indicate expensive items that you will need anyway, or cheap items that are good replacements. This is like the Frugal Gourmet for FFXI. Yes, I know, none of you got that reference. :(
Ok, on with the show.
Now, Monk is a ridiculously fun job and I love it personally. It is, though, a very situational job, so I do not use it in all situations. If you are looking for a Chi Blast set-up, then you are looking in the wrong place because Monk is and should be about punching things, punching things hard and punching them fast.
Ok, the TP set up first.
Weapons. You definitely must have Destroyers, and honestly, this is much easier than most people think. Just get a couple of friends and do Double Dragonian, it is no where as hard as people make it out to be, because they don't understand how the Dragons work. The Dragons become much stronger after their two-hour, not when the other one dies. So a simple strategy is go sleep the Bard dragon, quickly kill the Warrior then go back and kill the Bard. If you have problems at all with this then just kite the second dragon while you are recovering. Until you get Destroyers, you can use Faith Baghnakhs or Wagh Baghnakhs in the meantime.
Ammo. Two real options here, but I definitely favor Tiphia Sting because of the additional accuracy, and accuracy is what makes and breaks a good Monk. A Monk you should by end-game always be eating meat no matter the event, so you want an good amount of accuracy to keep up with that, and getting it in cheap places like the ammo slot is never bad. I will of course directly contradict myself on this later, LOL. Another good alternative is the Smart Grenade too, but I favor the extra accuracy.
Head. Walahra Turban plain and simple. If you don't have one, get one. This is a no-brainer.
Neck. Now, here is an area that can be a little varied, but as a minimum I would suggest Spectacles. 7 Accuracy is very nice, and for Monk, the +3 STR from the Chivalrous Chain isn't going to overcome the Accuracy from the Spectacles. Remember here that the effect of one piece isn't as relevant as the cumulative effect of all your pieces. 2 Accuracy here, and 2 Accuracy there can add up pretty quickly.
Earrings. Earring selection is pretty weak for Monk, but the obvious first pick it a Brutal Earring. Though it would be expensive if you bought the coins but with enough time in Limbus it should be relatively easy to pick one up. For the other ear the Ethereal Earring is the best selection and its is free and relatively easy to get after you have completed CoP. Alternative options include a Coral Earring or two or the HQ version, the Merman's Earring.
Body. Now, this suggestion is going to be pretty expensive but it is worth every dime: Shura Togi. This is one of those items that you should just save up for and get it and smile. Accuracy and attack are the key component to Monk TP build damage. Sure it is a Kirin drop, but it is a very common drop and any Monk worth their salt should always be trying to get one. If you do not have access to get the abjuration from Kirin, then either you aren't really an end-game player or you are an HNM-only end-game player, either way I can't really help beyond that. As an alternative a Scorpion Harness or the Pahluwan Khazagand can fill the hole until you get a Shura Togi. Oh, I wanted to toss this in because I see it all the time and it makes me crazy, DO NOT TP IN A KIRIN'S OSODE. I have heard about some parse where a Kirin's Osode did well or something and I call 100% bullshit. The math just doesn't add up. The accuracy and attack from Shura Togi just blows away anything you would get form the Osode. Just don't do it.
Hands. This is another area where it could get to be expensive but it could also be free. Also the different options are pretty close in capability so any of these would be a decent selection, but from my own personal selection, and up until I got my Usukane Gote, I was using Melee Gloves. Melee Gloves are a Dynamis-Jeuno drop and not really that rare plus the city Dynamis zones in general tend to be rather giving. Not only do they have a large amount of attack but HP and also Subtle Blow which makes them rather sexy over the higher attack but lower evasion. This is just a personal preference of mine, but just as acceptable with varying levels of cost and difficulty to obtain are Ochiudo's Kote, Ochimusha Kote and Horomusha Kote.
Rings. There are many good options for rings, but free is always the cheapest so lets start with those. First is the Ulthalam's Ring which has decent Accuracy combined with decent Attack, but really shines in the place that Monk really shines, which is Salvage. For a Monk, I think this is a no-brainer, and a worthwhile investment considering the relatively less useful rings that come from the Aht Urhgan missions. And yes, the Aht Urhgan missions are easy, just get a couple of people together and do them, and yes Darkdawn, I will help you do them, just bug me about it sometime when I am free. :) For the other hand I would suggest the newly added Blood Ring which comes from Chigre which is a tier 1 spawn from the new ZNM system. The drop rate is high and it is very easy to get the pop item. The other ring alternatives I would suggest are the Sniper's Ring and to a lesser extent the Woodsman Ring. I favor the Sniper's over the Woodsman for the simple reason that the evasion is better than the defense. I would set these rings as the minimum that you should have for TP building, I would not go into the lower accuracy rings considering the simplicity in getting these rings. Some may suggest the Rajas Ring, but I do not for the simple fact that for a Monk it is only 2.5 Accuracy and 2.5 Attack, with the Store TP and Subtle Blow doing very little for a decently geared Monk because they will be attacking so fast. And I don't want to hear about fSTR and Crit builds, thats not your job as Monk. You want to hit things fast with high accuracy, thats it.
Back. There are some good expensive pieces in this slot but I would say that it is perfectly fine to pick up an Amemet Mantle +1 and be happy for a while. There are better mantles but they rapidly increase in price for comparatively little gain in performance.
Waist. There are only two options here, the first and the easiest is the Brown Belt. Camp Nue and camp Deadly Doodoo, then go do the very easy KS30 Contaminated Coliseum, where the drop rate on the Morbolger Vine pretty decent and the fight is very easy. The FFXI wiki has some pretty retarded strategies for this one, but all you need is a couple of /NIN DD and some healers, or some BLM and some healers, or really anyone that can figure out that when it starts prepping its death breath move they should GTFO and its an easy win. The second option is the Black Belt and getting one is a little bit easier than you might think. All of the Black Belt items come from KS99's, and most of those can be done by any decent end-game LS. The problem is that the drop rate on them is a little low, so it may take a while to get all three. Alternatively, you could go with any BLM burn group that does KS99's and get them that way. Also, if you have a friend in an HNMLS that is willing to help you get one from the one of the Zilart HNMs that is another path. Also, you can camp Adamatoise with just four or five people pretty easily, because most HNMLS don't even care if it is up or not. Whatever path you take, this is the one place where you should spend the most effort getting the items to make the Black Belt as it is simply one of the most amazing pieces of gear in the game.
Legs. Byakko's Haidate should be your immediate goal here. It is everyone else's immediate goal also, so that can be a bit of a log jam, but compared to how the case used to be, Haidates are much more available now than in the past. It may take a little while of Sky time, but if you have an end-game LS it should come inevitably. Just don't be a dick and get your Haidate and take off, I fucking hate people like that, and I am not making a guide for selfish, greedy douchebags, I am making for people that want to be good players. There are a bunch of decent but ultimately not as close options for the legs slot. I would guess they would go in the following order: Melee Hose because the Kick Attacks will speed your TP build, and they are pretty easy to get from Dynamis-San d'Oria. Next, Shura Haidate which are pretty expensive, but they come from Byakko, which you are going to be doing anyway, and are probably more available than Byakko's Haidate to start. Since you will need them for your WS build anyway, they are an investment you are going to have to make anyway. Finally, the Pahluwan Seraweels can fill the gap until you get something better and can double for WS gear, too. I would shy away from the Strike Subligar as the bang of the buck is pretty low and you will be getting rid of them inevitably.
Feet. The old stand-by has always been Dune Boots because they are free and easy to get from a Sabotender NM in Quicksand Caves. Just grab a person or two to get you into the area, kill the place holders until it pops then call a couple of people down to kill it. The Dune Boots are nice because they increase your kick attack damage by a whole lot, the problem with them is that they have no other stats like Haste or Accuracy that we cry for on MNK. Before Usukane though, Dune Boots were favored over just about everything else. There is a new interesting alternative now available though, from the ZNM system: Enkidu's Leggings. These leggings have decent haste and some Attack and other decent stats, I don't know if they are better than Dune Boots, but considering the easy in popping a Tier 3 ZNM and the high drop rate, it's worth looking into. Also, available are Fuma Sune-ate for haste or Hakke Habaki for Kick Attack rate.
And there you have a decent TP build. :) Remember this is just what I think is what it takes to be a decent end-game monk. You shouldn't be complacent with just this gear if you know there is something better! Also, I didn't include Tier 4 ZNM drops yet, because I don't know how easy or hard it will be for a mid-range end-game LS to kill the NM, so once we do a few of them and I can gauge the difficulty I might go back and add in a few items like the Enkidu's Harness as an alternative for the body slot.
Now it's time for the WS build. Now, you should in general be aiming to use Asuran Fists for the large majority to all of your WS's. The simple reason is that a good accuracy and attack build will get the best return for Asuran Fists over the rest of the WS's over time. Sure, you might get a double attack proc on Howling Fist or Dragon Kick, but your average over time is going to favor Asuran Fists. This is compounded by the fact that all the good melee buffs that a Monk can get will improve Asuran Fists comparatively more than it will improve other WS's. The sole exception I can think of at this time, and it is also the sole exception for the use of Footwork, which a decently geared monk should avoid at all costs (the loss of attack speed destroys the potential damage benefits for anyone with a half decent haste build) is using Dune Boots with Dragon Kick, because of the way the WS works now, but I will get into that below. Now, on with your Asuran Fists WS build. One last thing about Asuran Fists, there is a 10% modifier to STR and VIT, which means that in essence their is no modifier to it at all. You would have to add ten of each stat to get one WS mod bonus to your AF, this is why you stick to accuracy and attack. You want to land all 8 hits and you want those hits to be hard. Cheap tricks and chicanery wont help you here.
Since the Weapons won't change lets skip right to Ammo.
Ammo. This one is the same exact decision-making process as for the TP build. You want accuracy or attack and with few options the Tiphia Sting still seems the best, with the Smart Grenade coming in a strong second. I would favor Tiphia Sting even futher for AF because you are trying to get all 8 hits to land at once, but the choice is yours.
Head. Another rather simple slot to fill. The best piece used to be Optical Hat because it offered by far the most amount accuracy on one piece, which is critical for Asuran Fists. Hakutaku used to be something of a challenge back in the day but now it can be done pretty easily by a competent party or slight more. The new piece that has taken over for Optical Hat is the Hissho Hachimaki. It has just a small reduction in Accuracy for a decent chunk of Attack. I will mention that I think that a good Asuran Fists build will have too much Accuracy, so losing just a bit for more Attack isn't a bad thing. The Hissho Hachimaki drops off of a fun and relatively easy Tier 2 ZNM in Alzadaal Undersea Ruins.
Neck. Stick to your accuracy here again, and go with the Spectacles. Chivalrous Chain again falls victim to Asuran Fists lack of a real damage modifier. As a side note, since with a little concerted effort it is pretty easy to get the WS gorgets from sea (AF would use a Soil Gorget) I would say that you should still avoid them because it is unclear at this point how much accuracy is gained after the initial hit of the WS. Until a more clear definition of the effects that WS Gorgets have on accuracy, I would not recommend them for Asuran Fists.
Earrings. Let me state this first and clearly so there are no mistakes, double attack can not proc on Asuran Fists. The reason that this is true is because the most amount of attacks that can happen in one attack round is 8. This includes every effect in the game, including occasionally attacks X times weapons. So that puts the Brutal Earring right out of consideration. And that leaves us basically with attack earrings. I would tend to favor Merman's Earring for the obvious reason that they give more attack, but again the Ethereal Earring and Coral Earring are just fine as alternative options.
Body. A good investment is one that you can use for many different things, and that is why your Shura Togi is going to be worth all that gil. Remember, you are looking for accuracy and attack here so the Scorpion Harness or the Pahluwan Khazagand can still fill that role, and because as I mentioned before the stat modifiers on Asuran Fists are so low that using a Kirin's Osode is even more stupid than using it on TP build.
Hands. Hands for Asuran Fists are going to be generally the same as TP build, but I do want to mention that I have tested my Usukane Gote for AF, and I still favor the Attack hands that I use, the accuracy doesn't seem to do much to overcome the additional Attack that is gained. I will change the order a little bit here and place the highest Attack hands first, because the evasion isn't going to matter for the short time you have your WS gear on, and the Subtle Blow isn't going to matter because of the way that the game determines the amount of TP you give a mob on WS's. Because of this I favor the Ochiudo's Kote or Ochimusha Kote, then the Melee Gloves, then finally the Horomusha Kote.
Rings. Absolutely nothing changes here for Asuran Fists from your TP build, so stick with your Ulthalam's Ring/Blood Ring combo. And the alternatives are the same; Sniper's Ring and Woodsman Ring. Remember, avoid those accuracy rings that are less than +5, they are just gimp versions of things you should already have. And just say no to the Rajas Ring for the same reason you say no to the Kirin's Osode on AF, modifiers don't matter.
Back. Again, another slot where nothing changes, use that Amemet Mantle +1 and don't worry about anything else until you have money for a much more expensive back piece.
Waist. This one might come as a surprise, but if you have been following the reasoning behind these decisions, and are getting the philosophy behind Monk, then it shouldn't surprise you at all. You should use a Life Belt. Plain, simple, effective. It is best because what else are you going to use in that slot? Stats? No. Attack? Maybe, but in general I would say if you have a 1 for 1 trade off I would go with Accuracy over Attack, only once you get up to the 2 for 1 trade off do I think a change is justifiable (as I did with the hands slot above). This is so cheap, so easy to get, and so useful there really are no other alternatives.
Legs. Finally, a slot that has something different, but n. Again we are looking for accuracy or attack here, and the best source of accuracy is the Shura Haidate. After that things start to fall off a bit with the Pahluwan Seraweels coming in next, and after that, well, I can't even really think of much that is worth mentioning. Another reason why spending that money on Shura gear is worth it, because without it, you aren't left with much at all.
Feet. The feet slot sucks for Monk for the most part and until Usukane was introduced, it sucked for the entire part, and since we aren't even discussing Usukane in this guide, we are left with some sucky options. My first suggestion here is to go with Pahluwan Crackows because of the 5 accuracy on them, but I don't know if they are worth the 20,000 AP you would have to pay for them. I used to use Rasetsu Sune-Ate
because I decided that the Pahluwan Crackows just weren't worth the price. Finally, the new Enkidu's Leggings are also an option, with a little bit of Accuracy and some Attack, and they are free. But mileage may vary. Remember, don't use any Kick Attack gear for Asuran Fists or any Monk WS for that matter because Kick Attacks can not proc on a WS.
And there you have it, a guide to be a non-crappy Monk. If you follow this guide, you will at least not embarrass yourself when you are running around on Monk. And, don't think that just because someone else has better gear than you that they are some how smarter than you. There are no less than three full Usukane Monks on Odin right now running around with Chivalrous Chains and Rajas Rings. I also want to say that I don't know everything, and I still have a lot to learn, so if you have any suggestions, then feel free to post them! And I can't even take credit for this guide as I have learned from many other people, and have gleaned information from many different forums and websites to come up with all that you have read. On that note, I hope you listen and learn from what I have to say, and that even if your gear isn't perfect yet, keep working toward it and some day you will get everything you want. :)
Monday, June 23, 2008
Recovery.
I was out the end of the last week because I was sick, so I have a lot to cover since then. First, Versus stuff. We did another JoL, actually we were supposed to do two but another LS rushed to spawn one just so they could do it before us. It's the kindly people that really make this game great for me. LOL Anyway, just a Love Torque dropped which makes it the second most torques from one sea NM after Faith, I believe. orz Outside of that I have been doing quite a few ZNM as of late, well, at least been trying to do a couple more of them in my limited spare time. They are all pretty fun to do an the tier 3 ones definitely have some difficulty attached to them. I am looking forward to helping Iz get those Aurum Sabatons and some other gear that is pretty decent from the whole system. Apparently, there was a bug in the system that let you spawn a test mob that SE left in the game but that has been removed, and hopefully someone will be able to spawn the top NM if SE gives them their pop item back. The most difficult mob we have done so far has been Armed Gears. 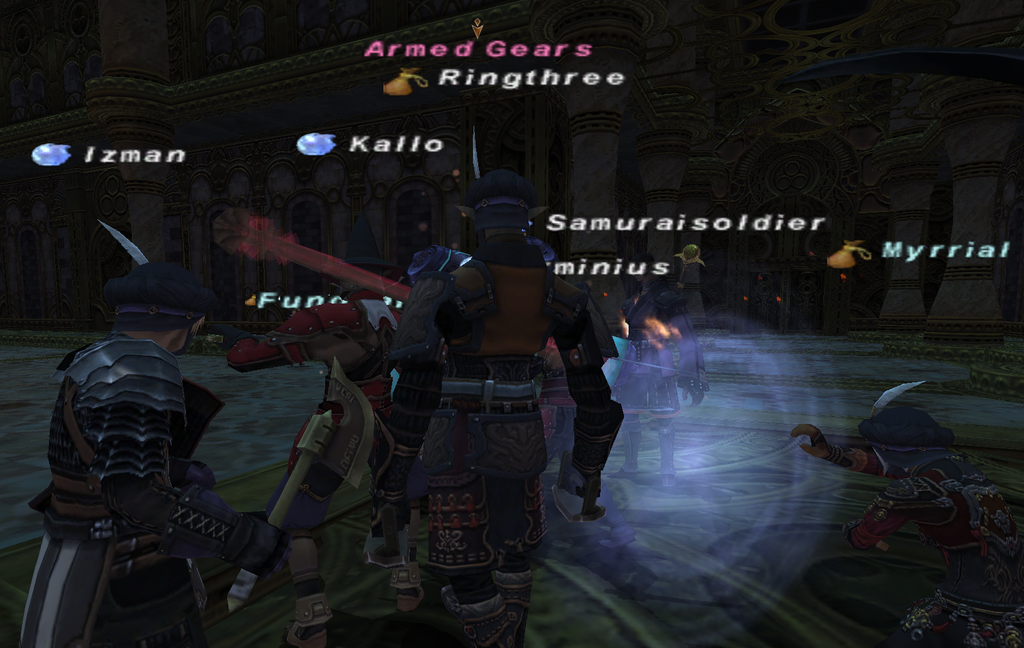 Let me rephrase, this isn't a difficult mob so much as a strange mob. It is a RDM caster but can use Mighty Strikes. It will cast en-spells constantly which determines its weakness of the element that is strong to it's en-spell. If it is dispelled it will move into either light or dark modes where it will be able to cure itself and become highly resistant to damage, even more so than normal. Normally, it is still very resistant to damage. Now the interesting things here is that it hardly ever uses TP moves even when feed a lot of TP, but I believe that we were able to determine that the Antigravity move was at least a partial hate reset. So we decided to kite it during these times to prevent the healer from taking too much hate. It also had another move called Heavy Armature which gave it a huge number of shadows and an Invincible effect for some time. Our basic strategy was to use skillchains and magic burst with the magic to which it was currently weak. Even with this strategy it is still a rather long fight just to get it to 50%. Once it is at 50% it will lose a gear and become slightly weaker in defense but not much in offense. Finally at 25% it will become rather weak to melee and magic and is pretty easy to finish off, unlike many other mobs in this game. Offensively, even though it doesn't use TP moves very often and they are generally pretty weak, it still hits like a bus. It was hitting a very well geared PLD/WAR for 200-300 per hit, but it doesn't hit very fast so it was manageable. Drops are generally very good from the tier 3 ZNM's, and the two times that we killed it we have gotten the Aurum Sabatons and the Oracle's hands, along with other grips. We have also done Nuhn on the third tier, which is also rather easy and is just a kited fight in general, with the only important note being that it spams Death Gnash (1HP left and hate reset) at low health, which turned out to be pretty good for us because it would use that on someone that pulled hate then switch back to the tanks. Good drops there too, including the Enkidu's hands and the Oracle's feet. Personally, I have gotten a Blood Ring
 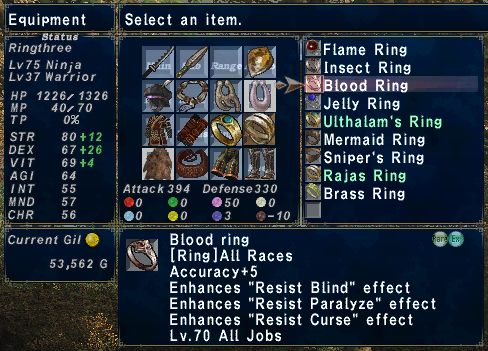 an Insect Ring
 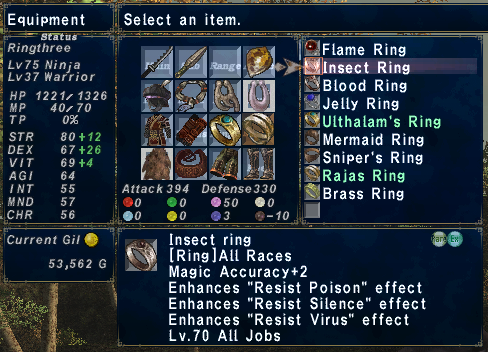 and a Hissho Hachimaki.
 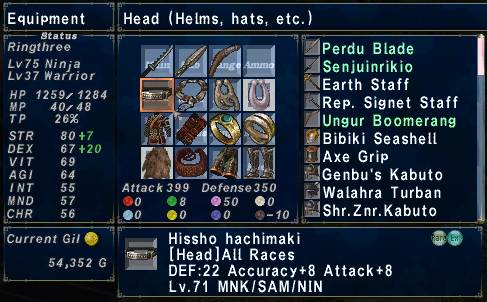 This Hissho Hachimaki is now part of my Asuran Fists macro and I am quite happy with it overall. :)
I have done a myriad of other short but sweet events lately, including some relatively uneventful Salvages save for Crlmsonking getting a Marduk body 35 piece from one of the frogs in Zhayolm, while Hiryo is still waiting on his Usukane head 25 piece to complete his piece. I have completed the new Wings missions which were disappointingly short compared to what SE claimed they would be, but they were still amazing to watch and enjoy and I can't wait until we learn more about Cait Sith and the Walk of Echoes. I even got to level my WHM a bit even though it is still just 61 and get some more meriting done in my spare time. Also, I need to complete my rank up in the past because I will soon lose my current badge. I do like the new system for Campaign tags and I plan on using that on my WHM at least weekly to get more XP for it. I really feel like I should finish it up because there are other jobs I want to move onto now. :)
Tomorrow! The real return of On the Cheap for Monks! It should be concluded then too! And I will post it all together in one rather long post so that people can follow it there. :)
Wednesday, June 18, 2008
Some things I promised.
Here is your Zeni NM chart. I tried to be clear on the tiers and the drops since that is what most people wanted. Of course this is not any new information, but I think a simplified chart will help people get a better grip on the system and more importantly what they need to do to get to the drops that they want. Like I said there are better looking charts for the Zeni NM system but I think this one is more goal oriented. I tried to get the chart to show on the front page, but it is far beyond my skills. LOL
Things to remember about the Zeni system:
1. Zeni is obtained by trading in Soul Plates from the mobs that Sanraku is interesting in seeing. The best way to get points is to find the highest level version of the monster and to take pictures at the lowest possible HP. I prefer nothing more than 3% and 1% is optimal. Any requested mob that is level 80+ at less than 3% will almost always at least 98 or 99 Zeni. I believe that 99 Zeni is the maximum per soul plate, putting the most Zeni you can get per Vana'diel day at 990. If Sanraku requests a monster that doesn't have a version above level 80 then your maximum will be lower, and there isn't much you can do about that.
2. Don't worry about the special requests. They are too hard to get without having to do them anyway. It's a good idea to have your camera on you all the time in case you get to see an NM, but they are not necessary to participate in the event at all. Also, they do not break the 100 Zeni per soulplate cap so it's of even less interest to focus on these.
3. Tiers. The first tier just requires Zeni to purchase the spawn items, but for Tier 2 and 3 you will be required to bring a trophy item from a mob of the previous tier from the same branch. On the chart above they are all the ones on the same column. For Tier 4 though, you will be required to turn in all three trophy items from the Tier 3 mobs in the same column. So for example, if you want to spawn Tinnin (Hydra) you will have to hand in the trophy from Armed Gears, Dea and Gotoh Zha the Redolent.
4. Tier 4 mobs. Tier 4 mobs are spawned on the Stone Monument islands around the Aht Urhgan areas. Although only one person needs to have the spawn item, everyone will need a 500 Zeni salt to reach the island to participate in the fight. At this time I do not believe there is a limit on the number of people that can reach the island to participate in the fight, and I do not know if the island is locked out to new people reaching the island once the mob is spawned.
5. The drop rate on most items is surprisingly good, the rate at which you can gain Zeni and spawn mobs is surprisingly fast and the mobs you have to fight are surprisingly interesting and some are even quite difficult. This system is fun and fast, and the Tier 4 mobs drop enough items to make it very worthwhile to do this system repeatedly.
I hope the chart helps and tomorrow I am going to return to my "On the cheap" series. :)
Tuesday, June 17, 2008
As per your request.
A couple of people have asked about the new NM system, not so much about how the system works, but more about what the drops are and what path they should take to get to certain drops. So I am working on something for them right now, hopefully but doubtfully I will have it done before I leave for work. :)
Monday, June 16, 2008
Lack of focus.
I have been pretty busy with keeping myself not occupied with writing my blog as of late. I have a little bit of a writer's block I think, and after almost two years of sustained writing of this blog, I can understand that. Most of my opinions about things are already known, I don't know if I can bring anything knew to the world of FFXI that hasn't already been hashed and rehashed. I will keep writing, but I may lack focus for a little while, and honestly, I really like Sudoku right now and that is killing my writing time at work. :)
On with the show...
Haven't really gone over the new stuff in the update yet, and I do think this update is very, very good. I could add more platitudes to its greatness, but there is no reason to do so. I really like the new Zeni NM system, already dubbed the ZNM system for short. It has decent rewards, the battles are interesting and fun for decent sized groups even if some of the mobs are a bit over powered in some of their TP moves. The drops are mediocre to awesome, and getting to the next tier is not that difficult at all, just need the Zeni to support it. Getting Zeni isn't even that difficult if you know what you are doing. The only complaint I have heard so far is that grinding Zeni is hard, but that person was retarded and didn't understand how to do it correctly. Such is the case with people that do not understand things immediately, they reject it out of hand without a second thought then engage in crying and whining about it as loudly as possible.
Anyway, the point is that these are fun encounters that can be done in between events or as events, or anything in between. There are at least a couple of pieces of gear that I am drooling over already. And the materials from the bosses are legitimate, most importantly Cerberus dropping its hide, which will probably significantly effect the market for Cerberus Mantles. I like the fact that some of the upgrades on the lower levels are small but they are noticeable. For example Chigre drops a +5 Accuracy ring with some random resists on it, which can replace a Sniper's Ring even though the level is much higher, and it also drops a +2 Magical Accuracy ring, which is new. 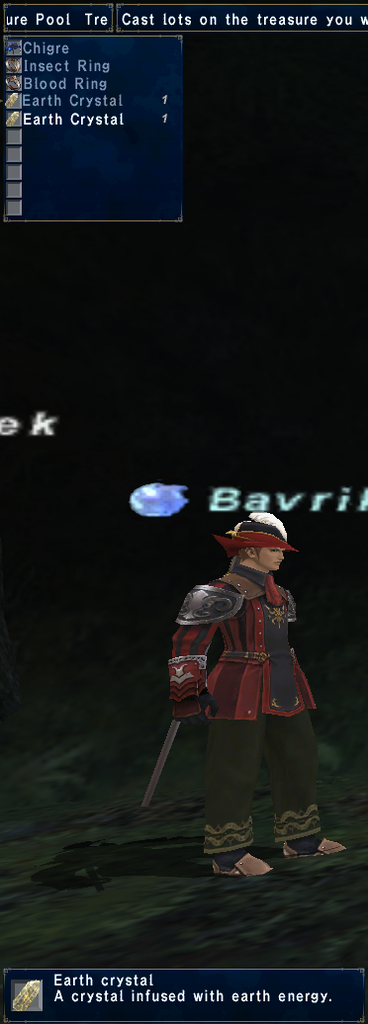 Though not all of the NM's have good drops, most have good situational gear or something that is a treat for some job or another. Lil'Apkallu is another good example
  a decent set of +healing MP boots and some Footwork feet for Monk, it is interesting because it runs around and uses TP moves afterward but isn't too difficult. The tiers are relatively easy to progress through and even the tier 3 mobs have great drops and the fights are very interesting or difficult or have some twist to them. For example, you have Wulgaru
  who is pretty devastating because it constantly uses TP moves that go right through shadows, that is until about 75% when its arm blows up, and it gets a little weaker, and then finally, well... its time to have some fun. LOL
  Have fun with these, I have done tier 1-3 but have yet to do a tier 4, which I am looking forward to. :)
Wednesday, June 11, 2008
If I hear one more word about the new relics I am going to stab people.
Ok, I got it, there are relics, new ones even. Yes, it is amazing, incredible, stupendous even.
Here is the thing you are missing, it's going to be hard as fuck to get them!
I would think that people would have learned by now that they are not going to make the new relics easier to obtain than the old relics. SE is not really that into making gear obsolete, though they do occassionally, but they absolutely aren't going to hand out devastating weapons willy-nilly. There are going to be bunches and bunches of people that really want these new weapons and they are going to be just like the people that collected Dynamis currency for months then just sold it all to buy other gear, some doing it out from under their LS's noses. I am sure we will have tons and tons of people pursuing these new relics, but its going to take time. And guess what, the relics aren't even in the game yet.
Yeah, if you hadn't figured it out by now, SE knows that we check the dats for the game, and the dats for the new relics, though there already, are obviously not the final weapons. It is impossible to complete a relic in the time given before the next update at very least. The first stage of requirements could be done before this patch was even released, which included having killed many of of the mobs in the ToAU areas. The second stage requires a bunch of very high collection requirements from Salvage, Einherjar and Nyzul Isle. Things like this new Alexandrite. 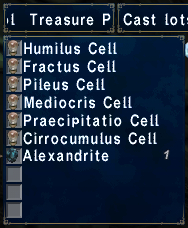 No one even knows what the third stage is yet, and even the dialogue in the dats is unclear about it.
My point is, and I needed to get this out, that we don't need to know RIGHT NOW what the requirements for the obtaining the new relic weapons. I am much more interested in the currently doable like the new NM system which does have several rather good pieces of equipment scattered about from the mobs, and they are tiered. Also, it does require a little bit of effort but not much for people to help with the NMs even if they don't want to deal with the new system. Overall win/win I have to say. There are a couple of people complaining about the new system but honestly there are a couple of people that would complain about absolutely anything.
After a little bit more testing I have to say that I still think that Footwork sucks. The real problem with it is that it is pretty much just a WS buff for decently equipped Monks, and an excuse for poorly equipped Monks to continue to be poorly equipped. Meh. Not a disappointment per se, but it's definitely one of those things that I know will cause dumb players to become even more stupid. :(
Tuesday, June 10, 2008
Ok, everyone please just shut the fuck up for a second.
Man, the unending speculation, the myriad of ideas, the ceaseless chattering. My head was ready to explode yesterday just reading threads about what people though of the update and what they did to many different things. New monsters, new gear, new abilities, new items, new quests, new everything. This update was ridiculously huge, and I will give you a run down with what I believe is a reasonable description of events without the hype, chattering, crying or whining.
There was a whole lot going on so I can see it becoming overwhelming to a point, but breaking it down into little chunks may be beneficial to help wrap our brains to wrap around the huge changes that were brought about with this update.
* New missions. I have no idea about these, but from what I hear there are not many of them. I am guessing they will probably be short and not reveal much to us. I really wish that this had been more of the content as they said it was going to be when they first announced the update, but with everything else that is going on in the update, it is not that bad.
* New NM's. The obvious first observation is that Dark Ixion is now prowling the past, and is very interesting. As it stands alone, it can be engaged but once it is engaged it will run off at a high rate of speed. Apparently, Stygian Ash which is a drop from Faeries in the past (not that uncommonly) is used to aggro it and a hit will allow it to be fought without it fleeing again. At this point information is known about it but it is without an HP bar so it may be taking damage but it is unknown if it is even killable at this point. There is probably another item that has to be used to make its HP bar appear. Interestingly enough, it seems that it can respawn in different zones at different times. Lots of information still needs to be gathered about this one. The second NM that appears to have been changed is Sandworm. Although Sandworm in the past did nothing, it appears that it now at a certain point it will use a TP move called Doomvoid, which will suck all of the players currently in the party with claim on the Sandworm into one of the three instanced zones in those areas, e.g. Everbloom Hollow, and there you will be able to fight Serket, King Arthro or Guivre (Guivre is in the dat files but not confirmed yet). These mobs are highly buffed versions of the ones in the present and there are no confirmed kills as of yet.
* New NM system. As word trickled in on this one, I thought it was going to suck, but it turns out to not be that bad really. You basically talk to an NPC, and that NPC will give you a specific request which is pretty hard to come by, and a more general request which isn't that bad. You then have to take pictures of the mobs with the Pankration camera and film then trade them in for points. The points are then traded for pop items for a plethora of NM's throughout the Aht Urhgan areas. These NM's appear to have 2 possible drops and can get to be very good items, and they also drop another item that is traded in for a future NM pop item. At some point along the way, you can get a pop item for an NM on the stone tablet islands around the main Aht Urhgan areas. To get to the islands you must get a 500 point item to trade to the stone tablet, then on the island is a ??? where you will likely trade the pop item. The mobs include Cerberus, Hydra and Khimaira and those are assumed to be the higher level pop monsters. It looks like everyone that goes to assist with these higher level spawned monsters will need salts to get to the islands.
*Einherjar. Almost everyone knows about the fixes so far, including normal mobs giving you ampules, not having to complete every single chamber to get Odin access and a new item for 100,000 ampules that I will get to later. They also slightly adjusted things to make it easier to pull, because the linking will occur normally instead of all mobs linking at once. There were a couple of complaints that for the higher tiers the linking helps to draw all of the mobs together faster, but I think this can be dealt with relatively easily for those that can already do it.
*Group 2 merits. Outside of a slight nerf to Overwhelm for SAM this appears pretty much as they said that it would. The tiers are now 3,4,5,5,5 so it is not as major of a burden as it could have been had they kept rolling up the numbers. I think that I will be shifting over to 5 Overwhelm and 5 Blade Bash for SAM and then just continuing what I already have for MNK. Two MNK with maxed Penance can now keep up the TP down effect in perpetuity. Waiting on Izman to test his new Iron Will effects, and if it doesn't work, waiting for Highlife to kill him. LOL
*New Job Abilities. Footwork sucks, as I thought it would, but its also not as bad for certain situations. The problems it has is that it is not effected by haste, spells or gear. Just a flat 480 delay. This means that well geared MNK will have next to no use for it, but for those that have marginal gear or are still working to get better gear. I will likely almost never use it, except for opening on an NM in Salvage. Since it does do more damage and you get more TP from Asuran Fists, I could open or at least use it for one AF then turn it off immidiately, like DRK do with Souleater. I will probably make a macro for that and carry my Dune Boots on me again, but I don't think its going to matter that much. I worked hard for all the haste gear that I have, I don't want to give it up! LOL Reprisal looks to be pretty good, but I am not a PLD, and the guy that sells the spell was captured last night so I didn't get to see any definitive testing. It does look like it makes a huge difference in block rate and the damage that is returned is half of the damage that is taken by the PLD before other adjustments are factored into the equation like Phalanx. The new BRD ability basically works as indicated, the BRD uses the ability, then targets a player with a song and only that player will get the song. Nice for PLD in XP and low MP situations, but nothing ground breaking.
Ok, that is just part of the update, I haven't even gotten to the new equipment or the new relics. But I will get to that tomorrow.
Friday, June 06, 2008
On the cheap 1: Monk part 2.
In continuance from yesterdays On the cheap post, he is part 2 on equipping Monk.
Earrings. Earring selection is pretty weak for Monk, but the obvious first pick it a Brutal Earring. Though it would be expensive if you bought the coins but with enough time in Limbus it should be relatively easy to pick one up. For the other ear the Ethereal Earring is the best selection and its is free and relatively easy to get after you have completed CoP. Alternative options include a Coral Earring or two or the HQ version, the Merman's Earring.
Body. Now, this suggestion is going to be pretty expensive but it is worth every dime: Shura Togi. This is one of those items that you should just save up for and get it and smile. Accuracy and attack are the key component to Monk TP build damage. Sure it is a Kirin drop, but it is a very common drop and any Monk worth their salt should always be trying to get one. If you do not have access to get the abjuration from Kirin, then either you aren't really an end-game player or you are an HNM-only end-game player, either way I can't really help beyond that. As an alternative a Scorpion Harness or the Pahluwan Khazagand can fill the hole until you get a Shura Togi.
Hands. This is another area where it could get to be expensive but it could also be free. Also the different options are pretty close in capability so any of these would be a decent selection, but from my own personal selection, and up until yesterday when I got my Usukane Gote, I was using Melee Gloves. Melee Gloves are a Dynamis-Jeuno drop and not really that rare plus the city Dynamis zones in general tend to be rather giving. Not only do they have a large amount of attack but HP and also Subtle Blow which makes them rather sexy over the higher attack but lower evasion. This is just a personal preference of mine, but just as acceptable with varying levels of cost and difficulty to obtain are Ochiudo's Kote, Ochimusha Kote, Bandomusha Kote and Horomusha Kote.
Sorry, thats it for today, part 3 on Monday!
Wednesday, June 04, 2008
On the cheap 1: Monk.
Ok, this is going to be a series of posts that I am going to do to help people that are new to jobs at end-game. This comes from experience and opinion, but in the end, it is what I believe is the best, easiest and quickest way to get to a point where you can start tweaking your gear instead of trying to get major items that you really need. Before I go into today's subject, Monk, I am going to go over a few things that I believe are prerequisites for this discussion to be of any help at all.
1. You can't be dumb. Sorry, if you are dumb, I can't help you. If you are the kind of person that hears something and then sticks to it no matter what, just quit now. If you can't adapt to changes in the game, quit. If you refuse to do something because you don't think that should be the play style of the game, then just fucking die in a fire. Flexibility is key, the more we learn about things in the game, the more we improve the play style and the more things change.
2. You have to really be an end-game player. I am not expecting you to have every title in the game, and have done ever mission everywhere, but I do expect you to have done main story-line content. This should be a goal of an end-game player at the very least. Zilart should be finished up to at very least Sky, CoP should be finished up until the end, and Aht Urhgan up until the end. If you don't have these, or at least most of it and trying to get to the end, then you aren't an end-game player, you are just lazy or your are just making pretend.
3. You have to be able to do some end-game events. I am not demanding that you be in a full-time HNM LS or anything, but you should have access to a LS that does at least some of those end-game areas/events. If you don't then you really aren't an end-game player, you are just a player with a job at 75.
4. You have to be willing to spend at least a little bit of gil. Sure, this series is called "On the Cheap" but it is not called "On the Gimp" so you will need to spend some gil getting some of the gear that you need. I am not going to tell you to get all HQ gear unless it is cheap, and I will also indicate expensive items that you will need anyway, or cheap items that are good replacements. This is like the FrugaL Gourmet for FFXI. Yes, I know, none of you got that reference. :(
Ok, on with the show.
Now, Monk is a ridiculously fun job and I love it personally. It is, though, a very situational job, so I do not use it in all situations. If you are looking for a Chi Blast set-up, then you are looking in the wrong place because Monk is and should be about punching things, punching things hard and punching them fast.
Ok, the TP set up first.
Weapons. You definitely must have Destroyers, and honestly, this is much easier than most people think. Just get a couple of friends and do Double Dragonian, it is no where as hard as people make it out to be, because they don't understand how the Dragons work. The Dragons become much stronger after their two-hour, not when the other one dies. So a simple strategy is go sleep the Bard dragon, quickly kill the Warrior then go back and kill the Bard. If you have problems at all with this then just kite the second dragon while you are recovering. Until you get Destroyers, you can use Faith Baghnakhs or Wagh Baghnakhs in the meantime.
Ammo. Two real options here, but I definitely favor Tiphia Sting because of the additional accuracy, and accuracy is what makes and breaks a good Monk. A Monk you should by end-game always be eating meat no matter the event, so you want an good amount of accuracy to keep up with that, and getting it in cheap places like the ammo slot is never bad. I will of course directly contradict myself on this later, LOL. Another good alternative is the Smart Grenade too, but I favor the extra accuracy.
Head. Walahra Turban plain and simple. If you don't have one, get one. This is a no-brainer.
Neck. Now, here is an area that can be a little varied, but as a minimum I would suggest Spectacles. 7 Accuracy is very nice, and for Monk, the +3 STR from the Chivalrous Chain isn't going to overcome the Accuracy from the Spectacles. Remember here that the effect of one piece isn't as relevant as the cumulative effect of all your pieces. 2 Accuracy here, and 2 Accuracy there can add up pretty quickly.
More tomorrow! :)
Big fat liar.
So, not only did I not have two posts on Monday, I didn't even have a post yesterday. LOL Ok, so going for two posts today. Monday and Tuesday were pretty normal actually, I have been doing a lot of farming, but with maintenance costs I am only gaining a little bit of ground, but it is nice to have over 100k on my person all the time instead of 5-10k. Lets see, Monday produced a good Zhayolm run, but no froggie drops and the boss didn't necessarily give us anything we needed. So no completed sets from that and Hiryo still needs to get his Usukane 25 head to complete his piece. Tuesday resulted in some good Sea farming and then another Zhayolm run with Rakuen with essentially the same results. Still loving Salvage. :)
Now, for some of the good news from today.
New Notorious Monsters (NMs) will be added to areas introduced in the Treasures of Aht Urhgan expansion pack in the forthcoming version update, with simplified access to their battlefields.
A Word from the Development Team
NM battles have been one of the most popular elements of FFXI since its launch. Nothing stirs the adventurer's soul quite the same way as cooperating with dependable comrades to overcome seemingly insurmountable odds, with rare equipment drops being the very tasty icing on the cake.
Thus far, however, getting the chance to battle NMs has been almost as difficult a task as fighting the creatures themselves. One often needed a lot of time and plenty more luck to successfully arrange an encounter with the creatures. In light of the ever-increasing number of fan requests for more opportunities to do battle against powerful monsters and reap the rewards, the development team has decided to implement some changes to make the excitement of NMs—even those of the same caliber as particularly infamous varieties inhabiting Tu'Lia and Al'Taieu—more accessible to all.
Overview of the New SystemCarrying out requests from a certain NPC will earn you points which, when accumulated, can be exchanged for NM trigger items. The cost of these triggers will fluctuate based on the corresponding NM's difficulty level and popularity among adventurers. A limit will also be imposed on the number of points that can be earned in one Vana'dielian day (one Earth hour). Even with the above conditions in place, obtaining triggers under this new system should be relatively pain-free, especially when compared to fulfilling the elaborate requirements of some existing NM battles.
*Please note that this point system is applicable only to select new NMs scheduled to appear from the June version update.
In order to maximize flexibility in participant numbers, in most cases the target to which you trade triggers in order to gain entry into battlefields will be located in field areas.
Rewards
Over fifty new types of equipment will be made available as exclusive drops for defeating these new NMs. Here are just a few samples to whet your ravenous adventurer's appetite:

This looks like something can at the same time be low-manned, done at players convenience and very little "staring at darters". Now, I am not necessarily for or against low-man events. I think that they can be good, but are more dependent on certain people showing up, and can easily get screwed up with differing levels of commitments of the players. The reason that I like them right now is because the Versus schedule is getting kind of crowded. Monday is Limbus, then Assaults, then usually Salvage, Tuesday is an event, Wednesday is an off day, Thursday is an event and then Limbus, and then sometimes Salvage, Friday is Salvage and Assaults, Saturday is Salvage, and Sunday is an event then Salvage. I need something that I can squeeze into the time remaining, not something that is going to take up another big block of time. This is especially true with the Einherjar update and that leading us back to try to fix it in the schedule. Heaven forbid they introduce a new end-game area/event that will have to fit into the rotation.
This leads me to new thinking on how we do events now. We used to have a strict rotation on the events we did, some days were Sea, some Sky, some pop NM's, etc, the problem was that the Sky events were not leading to anything new that people needed, and so we have become more flexible with the events that we schedule. For example, when we do Sky it is to get Despot first, then other NM's, because we need the most gear from Byakko, even over Kirin at this point. We have already become much more efficient, but we can still improve. :)
I am really looking forward to this update at this point. It is looking much better than at least the last several version updates. And it just keeps getting better.
 #1 ~ Monk
 #2 ~ Samurai
 #3 ~ Ninja
 #4 ~ Dragoon
 Chaotic Pellucidity
 Teabags and KY Jelly
 The Bloggaru!